Showing posts with label growing food. Show all posts

Wednesday, May 16, 2012

Into the Trenches! How to Trench Plant Tomatoes.


You know the adage about the shoemaker's children? The same holds true for the gardens of nursery owners. Our first responsibility is to ensure our green babies thrive and find happy homes. Then, and only then, can we take a moment to put our own selected babies to bed.

Spring 2012 wrecked havoc on my plants...and my nerves. The seedlings grew beautifully in the new greenhouse—lush and full of promise. But then, our spring vanished in a blink, and we faced unseasonably warm temperatures. Those lovely little seedlings became behemoth, towering monsters...far too early. Yes, I—like most gardeners—was excited about the prospects of early tomatoes. But then, suddenly, the plants grew too large to ship. Or transport to market.

I sold what I could, gave away plants to friends, and searched for community and school gardens to donate the plants.

After hours and days and weeks and months of work...the majority ended up in the compost pile. 


Heartbreaking.

But—this is not a tale of woe. (Well, maybe it is a little bit of a pity party...but let's just shake that off, shall we?)

This is a tale of how you can take a too-tall tomato plant and turn it into a strong, healthy, fruit-producing machine!

I admit, this is the first year I've tried trench planting tomatoes. I've never needed to contend with ultra-tall plants before. However, I've always been a believer in planting tomatoes as deeply as possible to develop a strong root system. Trench planting embraces the same premise.


The tiny hairs along the stem of the tomato plant will develop into roots upon contact with soil. By planting more of the stem underground, you're providing more opportunities for root development. By growing more roots, the plant can absorb more water and nutrients to produce a greater crop. And—the additional roots provide a sturdy support, bracing the plant against strong winds and storms.

Trench planting is ridiculously simple.

Step 1:
Remove the plant from the container—unless it's grown in a biodegradable pot, like I use. If your plant sports a biodegradable pot, tear off the top lip of the pot to the soil line.


Step 2:
Dig a trench approximately 4 inches deep, and as long as your plant is tall.

Step 3:
Pinch off or snip any suckers along the stem, leaving at least four sets of leaves at the top of the plant. (Must have those leaves for photosynthesis, of course!)

Step 4:
Place your plant horizontally in the trench, gently bending the top portion of the plant upward. Be careful not to pull too hard, or you might snap the stem.

Step 5:
Cover the root ball and stem with soil, gently firming the soil around the plant. The top of your plant will lean a bit—but as the plant adjusts to its new home, it will straighten.


Step 6:
Stake your plant. Remember—you want to keep those leaves off the ground to prevent disease.

Step 7:
Water well.

Now, wasn't that easy?

A few tips when planting tomatoes:

I always add lime into the soil to provide a boost of calcium to the plant. Calcium helps prevent blossom end rot—that nasty black spot on the bottom of tomatoes. It's best to add lime into the soil a few months ahead of planting...but honestly, I add it at planting time, and it's never failed me. (Crossing fingers.)

Also—remember to water consistently. My rule is: stick your index finger into the soil, approximately one inch deep. If it's moist—don't water. If it's dry, time to water! Inconsistent watering also leads to disease and poor tasting fruit, so make certain to keep those babies hydrated.

While we're on the topic of water—avoid wetting the leaves, which also can cause disease. Drip irrigation is best—it allows the water to get straight to the roots.

And—don't forget to feed your babies. If you prepared your beds with good, organic components—you don't need to fertilize at planting. However, tomatoes are heavy feeders. I use fish emulsion or a good, organic fertilizer high in phosphorus as fruit sets, and then I feed them again about every two weeks throughout the season.

Take a look at the N-P-K ratio, the numbers you see on commercial fertilizers:
N = Nitrogen, which promotes tissue development and big, green, leafy growth. Too much nitrogen, and you'll have a lovely plant—with no fruit.
P = Phosphorus stimulates root growth and helps the plant set buds and flowers. This is key in developing delicious tomatoes!
K = Potassium improves overall vigor of the plant. It helps the plant make carbohydrates and provides disease resistance.

The key to selecting an organic fertilizer is to choose one with a higher “P,” such as 5-10-5.

So, my gardening friends, your tomatoes will have strong roots, adequate calcium and water, and enough good nutrients to produce delicious summer harvests for your dinner!

I'm growing 60 varieties of tomatoes in our gardens of the 160 varieties I grew for the business. (I just need more sunny beds so I can grow them all!)

What varieties do you plan to grow this year? And what's the most delicious variety you've ever eaten? I'd love to know...(I'm craving bruschetta right now...for breakfast! Hurry up and grow, tomatoes!)

Happy gardening!

XO ~

Julie

Tuesday, May 15, 2012

Blooming in the Rain.

Lately, I've focused on planting seeds and transplants in the new kitchen garden.

After all, if we want to eat delicious treats this summer, serious work needs to be accomplished in spring.


Our first peas barley made it into the kitchen. Really, is there anything tastier than eating peas straight from the vine? (Well, maybe snacking on just-picked strawberries while working in the garden might rival the peas...)

But spring also brings the best blooms, and once in awhile, you've got to get your nose out of the dirt and take a stroll around the garden to relish spring's visual bounty.

Many thanks to May Dreams Gardens for hosting Garden Bloggers' Bloom Day each month on the 15th. It's the perfect reminder to slow down and take a few moments to enjoy all of the pretties that we so often take for granted.

We've had a rainy few days in Upstate SC, as you can tell from the general darkness of the photos...or the over amplified flash. Still, I'm so thankful for the rain. Our drought status tends to worsen earlier and earlier each year, and I hope the past two days of downpours helped fill the lakes and aquifers.


The hydrangeas, obviously, enjoyed the showers. When I was a new gardener and attempting to grow my first hydrangea, I didn't understand the concept that a plant with "hydra" in its name might, perhaps, flourish if well-watered.

Huh. What a novel idea. 


Sometimes, it's the blinding glimpse of the obvious that turns a novice into an expert, don't you think?

Today, hydrangeas happily thrive throughout the gardens. 


 "Blushing Bride"


Variegated Lacecap Hydrangea

 Oakleaf Hydrangea

 Pink Lacecap Hydrangea


Most of our gardens are in deep shade, which I used to curse mightily when we first moved to our forested property. Now, I've made peace with our shade, particularly when July's muggy high 90s hit. I've also learned that there are plenty of gorgeous plants for our shady spaces.

Astilbe

Coral Bells about to bloom

 Catmint, which is a flurry of purple blossom all summer...even in shade.


Gardenia...and shade loving friends. 

Variegated Potato Vine.

Confederate Jasmine, divine smelling vine...which survived even after several attempts of the pups to dig it out.

 Sweetshrub in the forest

Fraise des Bois...forest strawberries. Have you ever tried fraise des bois? These tiny jewels are sweeter than any candy, grow in the shade, and the evergreen plants bloom and produce fruit all summer--until the first hard freeze.

 Tangerine trumpet vine

The last hurrah of azaleas. I never appreciated Gumpo azaleas until I realized how quickly our others bloomed and vanished.


In our tiny patches of sun, a few blooms awaited their photo op:

Stella d'Oro

Gaura, weighted down with rain.


Buddleia, first bloom of the season. Come along, little butterflies, dinner is waiting!

Provence lavender, ready to burst.

Of course, the blooms in the kitchen garden and herb gardens foreshadow delicious meals to come...

 Common chives. 


 Cucumbers.


A mystery squash plant, growing in the compost bin. Some sort of pumpkin, I believe, from the size.


German Chamomile.


 And, finally, tomatoes...lots and lots of tomato blossoms. I've planted more than 60 varieties this year...can't you just taste that first summer tomato?

So, while this Bloom Day is a bit gloomy and dark, I'm looking forward to meeting the many Garden Bloggers who participate in Bloom Day at the Garden Bloggers' Fling in Asheville this week!

Yes...can you believe it? I'm leaving the family for four days of garden tours, writing, and meeting fabulous gardeners, garden writers, and gardeners who write! Pure bliss!

Stay tuned--I'll be sharing my tours of really impressive gardens...that, hopefully, aren't too rain soaked!

Happy Gardening, friends!

XO ~

Julie 


Monday, May 14, 2012

Making Beds. (Vegetable Garden Beds, That Is.)


It's raining, it's pouring...down-pouring, actually. Hooray for the rain! Not only do our poor, empty South Carolina lakes need a refill, but I'm seriously behind in writing.

Lately, any free moment of daylight is spent in the garden, working frantically to prepare for the Carolina Farm Stewardship Association's Upstate Farm Tour. While I'm excited and honored to be included on the tour—particularly since we are not a traditional farm—I'm also nervous! I mean, honestly—who wants to tour an empty backyard?

So, my friends, that's where I've been lately, building and digging and planting and prettifying.

The garden tasks haven't left much time for writing—or washing laundry. (And gardening is just so much tastier than cleaning toilets.)

Fortunately, I'm making progress. When I last updated about the six new raised beds for the large vegetable garden, we chatted about creating soil to fill the beds. Remember my perfect calculations to determine how much peat moss, vermiculite, and mushroom compost I would need to fill the beds?

Well. Multiply that originally calculated 120 cubic feet...by 2.

Guess who made a teeny, tiny boo-boo in her math?

Yes. Yes, I did.

Now, in my defense, my math was correct. My ability to measure is what threw off the calculations.

Remember how I mentioned that the original garden slopes?


In designing the raised beds, Peter compensated for the sloping ground by building the beds to accommodate the slope—allowing the beds to appear straight, which resulted in a tiered garden.


Can you see in the photo above how the board on the right side of each bed isn't as tall as the board on the left side of the bed? In fact, the board on the right side is six inches high—which is what I used to calculate the height of the bed. In reality, the bed is 12 inches deep. The left board is 12 inches high, and the right side is dug out to make the height also 12 inches.

Thus, my miscalculation.

My formula for each bed should have been:

Length (10 feet) x Width (4 feet) x Height (1 foot, NOT .5 feet) = 40 cubic feet per bed, NOT 20 cubic feet...which is what I calculated.

Yeesh.

I apologize.

If you are building raised beds...I wish you a perfectly flat plot for your construction project.

Anyway...

Let's talk about making soil.

After all of the trauma and drama of getting another load of peat moss, compost, and vermiculite, we were ready to fill the beds.

It's important to mix all of the components well. Remember our 1/3 ratios? You want 1/3 peat, 1/3 compost, and 1/3 vermiculite to comprise the soil in each bed.

First, because it's so light, we added the peat directly into the bed.

Next, we poured the vermiculite on top of the peat...


...and thoroughly mixed the two with a rake. 


Then, we added the mushroom compost. And mixed. And mixed some more.


To ensure even distribution, we made half the soil for the bed, then started the process again—adding more peat and vermiculite on top of the already mixed ingredients, then raking in the mushroom compost—and finally mixing and smoothing the entire bed.

Peat. Vermiculite. Compost. Mix. Repeat.

And repeat.

And repeat.

Finally, with very tired arms and backs, the beds were ready.


In three of the beds designated for tomatoes and peppers, though, I added lime to the mix.
Lime adds calcium to the soil. Have you ever noticed a nasty brown/black spot on the bottom of your tomatoes? Blossom end rot is caused by a calcium deficiency in the plant. Lime helps keep your tomatoes looking lovely.

The Plan.
One of my goals for our garden is to provide diverse, interesting, delicious produce for our family. In fact, I'm challenging myself to grow ALL of our produce this summer. But that's a story for another day.

To meet that goal, though, I needed to plan strategically what to grow, how to space it, and how to prevent pests and diseases from decimating the crops. Additionally, all of the produce in the garden is grown from non-GMO, heirloom seeds...no super-powered Franken-plants to thwart diseases in my garden. Careful planning and maintenance are my superpowers of choice to keep the garden healthy.

Typically, I plant in standard rows. Rows and rows of heirloom tomatoes and peppers, throwing in a few beans and squash.

Now, with our new raised beds, I decided to implement a combination of companion planting and square foot gardening to maximize the output for each bed.

Honestly, this project wasn't cheap, particularly when someone miscalculates the amount of soil needed.

We need some serious return on investment here in the form of deliciousness.

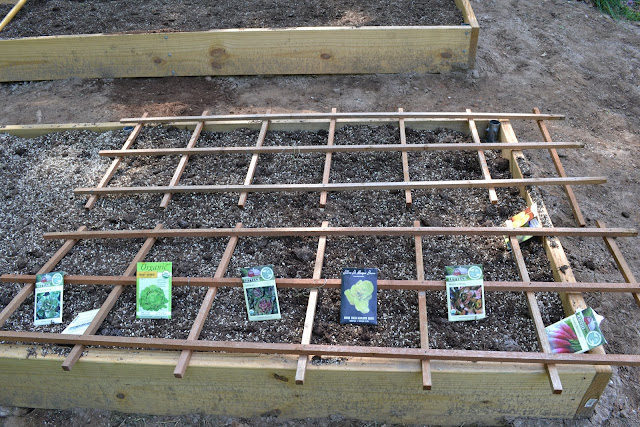
Square Foot Gardening is an intensive planting technique that divides a bed into a grid of 12” boxes. Each square foot is planted according to the harvest size of the produce. For instance, one tomato plant can occupy a 12” square, while four Swiss Chard or 16 radishes would fit in that same space.
The founder of Square Foot Gardening would argue that I'm not truly following his methodology. Rather than installing a rigid, permanent grid on top of the beds, I used a trellis I had on hand as a guide for planting. By laying it across the top of the bed, I formed the needed grid pattern that indicated 12” x 12” squares—and then I planted accordingly.

Four corn seeds (plants) per square foot: 
Along with the modified square foot gardening method, I decided to research which plants work well together. Companion planting is simply an interplanting technique—discovering which plants assist each other in growing well, which plants repel pests or attract beneficial insects, and even which plants repel one another.

Armed with my handy resource, Carrots Love Tomatoes, I made a list of the vegetables I planned to plant. Then, I researched the plants that would coexist well together and repel various pests, as well as the plants to avoid as bedfellows.

We've all heard about the Three Sisters Garden: corn, beans, and squash all are perfect companions. Beans provide nitrogen in the soil for the corn, corn supports the beans as a trellis, and squash serves as a mulch to keep the soil cool and weed free.

However, I learned so much more when I delved into various companions. Last year, like so many of my friends, my squash bit the dust due to squash vine borers. As I researched companions for the garden, I found that icicle radishes, planted in a squash hill and allowed to flower, help prevent squash vine borer.

 Squash and Icicle Radish Companions.
Who knew?

So, rather than quickly plant my garden haphazardly, as I have done so often in the past, I made a plan.

A real plan. For each bed.

The first part of the plan involved foresight. Because of the problems we've had in the past with soil borne disease, I created the garden plan looking forward to next summer—and planning crop rotation.

My natural inclination is to plant every bed full of heirloom tomatoes. After all, I grew 160 varieties this year. How can you not want to plant one of each?

Instead, though, I reined in my tomato lust and contained the tomatoes to three beds—with the plan to rotate each year.

Must. Prevent. Diseases.

It's my new mantra.

As I thought about what we like to eat and what I like to grow, I sketched out THE PLAN.
THE PLAN:
And then, I couldn't read my writing.

So, I tried to decipher my writing, breaking out the big picture into a sketch for each bed. And as I planted each bed, I attempted to record any changes I made along the way (like squeezing in an extra Cherokee Purple tomato here and there. You can never have too many Cherokee Purples.)

Now, for your viewing pleasure, I give you:

THE RAISED BEDS.

(In front of the beds is an existing perennial herb garden, plus more annual herbs that I just planted yesterday. I'll show you the herbs next time, because right now, they're naked and in need of mulch. It's not a pretty site. And I think this blog post is turning into a novel instead of a blog. Thanks for hanging in there!)

Left Back:
The Plan: Beans, Three Sisters Garden: corn, beans, squash; zucchini, Edisto melon


The Planting
 

Left Front:
The Plan: Cucumbers, three varieties; Moon & Stars watermelon, heirloom lettuce, five varieties. (Note: normally, you wouldn't plant lettuce this time of year in the south. However, our garden also gets a bit of shade, so I can usually squeeze in a late crop without it bolting.)

The Planting
Middle Back:
The Plan: beans, 2 varieties; potatoes, five varieties; Swiss Chard; arugula; spinach, 2 varieties; carrots, 2 varieties; leeks.

The Planting

Middle Front:
The Plan: Tomatoes, sweet peppers, Genovese basil

The Planting

Right Back:
The Plan: Tomatoes, Swiss Chard, nasturtium
 
The Planting

Right Front:
The Plan: Tomatoes, hot peppers, globe basil, Genovese basil

The Planting
So, there you have it, my friends. Six beds filled with potential garden delicacies.

I can taste the bruschetta already.

For now, I'll give you a break to rest from this epic adventure. Later this week, I'll show you a couple smart strategies to incorporate as you plant your garden. (Think sturdy tomatoes, heavenly herbs, delicious potatoes, and pest-free produce!) Stay tuned...

The sky is clear...and I'm afraid it's back to the garden I go. There's still mulch to spread and flowers to add.

(And a search for any extra spaces to add another tomato.)

Happy gardening to you!

XO ~

Julie