Showing posts with label cauliflower. Show all posts

Friday, January 4, 2013

New Year's Resolution: You Can Grow That!


The weather outside is frightful, but I'll admit it—I'm spoiled. As a former northern girl, I'm in garden bliss living in zone 7b. In our little piece of garden paradise, Upstate South Carolina's moderate winters allows us obsessive garden types the opportunity to grow year around. With only a minimal investment of time and money, simple low tunnels keep us in produce all winter long. (See here.)

I've always planted fall crops of lettuce, Swiss chard, and spinach, but this is the first year I have three full raised beds crowded with cool weather crops, as well as a potager filled with deliciousness. Along with my tried and true crops, I added cauliflower to the mix.

Isn't it so pretty?

I hesitated to grow cauliflower. I heard stories that it's temperamental. Challenging. Bug infused. High maintenance.

But then, in the throes of garden center delirium, I purchased a few transplants.
  
And tonight, Peter and I feasted on homegrown cauliflower.

Isn't it amazingly satisfying to eat from your yard?

(Of course, Mikey believes we're trying to poison him after we insisted he eat one floret. I'm currently enjoying a glass of Beaujolais Nouveau as my rewarding for sitting at the dinner table for 30 minutes while he fussed and choked on the single piece of cauliflower. Yeesh.)

So, before you listen to the naysayers who tell you that you'll spend hours every day defending your cauliflower transplants from cabbage worms, let me assure you—you can grow cauliflower.

Here's how:

Grow.
Cauliflower is a member of the Brassica family and grows best in a rich, well-drained soil. Keep pH at 5.8 to 6.5. This cool season vegetable prefers averages temperatures of 60 to 65 degrees. Plant early enough in the season to harvest before temperatures become too hot, or in my case—plant in the fall if your winter is mild or you can install low tunnels to protect the plant from freezing.

Space cauliflower in rows that are three feet apart and 18 inches between plants to allow for adequate growth. Water deeply—light watering will encourage shallow root development. Keep consistently moist.

Cauliflower is a heavy feeder, and nitrogen is important for the plant to produce a good crop.

To ensure the visual appeal of your cauliflower, it's best to shade the heads (called “blanching”) so that they don't become discolored. Some leaves may naturally grow over the forming head to provide shade from too much direct sunlight (which can also make the cauliflower taste bitter). However, a bit of gardener assistance is easy to provide. Gather outer leaves of the plant to join over the top of the head, then clip with a clothespin. After a strong rain, though, unclip so that water isn't standing on the head, which can cause rot. Allow to dry out, then cover the head again. A bit of discoloration typically doesn't affect taste, but too much heat and direct sunlight can affect taste.


Cauliflower grown in the fall garden tends to require less attention to pest control than spring-grown cauliflower. Honestly, I haven't picked one cabbage worm off of the cauliflower, but I know from experience with spring school gardens that you must be vigilant in warmer weather. Hand picking worms is the best organic method of control. (And kids love the challenge of finding the creepy critters.)

Companion planting can also assist in controlling pests that enjoy cauliflower. For instance, celery planted along with cauliflower deters white cabbage butterfly and cabbage worms. Aromatic herbs planted near the bed can improve the health and flavor of cauliflower and deters white cabbage worm by repelling egg-laying butterflies. However, please NOTE: Mint can be very invasive! Plant mint in a container and place near the cauliflower.

Additionally, the following herbs also benefit the health of cauliflower and other brassicas:

Oregano: Repels cabbage butterfly.
Rosemary: Deters cabbage moth.
Sage: Repels cabbage flies, black flea beetle, cabbage looper, cabbage maggot.
Thyme: Deters cabbage worm, white fly.
Wormwood: Repels animals in the garden when used as a border. Repels moths, flea beetles, and cabbageworm butterfly.
Harvest.
Harvest 60 to 70 days after planting transplants, when head is fully developed and before curds begin to separate. Leave a ruffle of leaves surrounding the head when harvesting to prolong freshness and quality. Store in the refrigerator.
Eat.
Soak cauliflower in cold water with a bit of salt and vinegar to flush out any aphids. For quick cooking, separate the head into florets.

Cauliflower can be eaten raw, steamed, stir fried, or in soup.

We tend to simply steam cauliflower or eat it raw. But homegrown cauliflower really deserves more attention, perhaps a celebratory soup for your success in growing cauliflower!

French Cream of Cauliflower Soup
From Chez Panisse Vegetables by Alice Waters
Serves 4 to 6

Ingredients:
  • 1 large cauliflower head (2 to 3 pounds)
  • 1 onion
  • 2 tablespoons unsalted butter
  • 4 tablespoons créme fraîche
  • Salt
  • Nutmeg
  • Chervil
  1. Cut off the stem of the cauliflower and any green leaves. Break up the head into florets. Wash them in cold water and reserve a few florets to garnish the soup.
  2. Peel and slice the onion thin. In a soup pot, stew the onion slices and the florets in the butter with a little water for 15 minutes, stirring occasionally, without letting them brown. Add water to cover and cook for 25 minutes, covered, over medium heat. Meanwhile, parboil the reserved florets in boiling salted water for 8 minutes or so, keeping them crunchy.
  3. Purée the soup in a blender and reheat gently to just under boiling. Add the créme fraîche and season with salt and nutmeg to taste. Serve the soup very hot, garnished with the whole florets and a few springs of chervil.
As you sip your delicious soup, aren't you glad that you grew cauliflower?

On the 4th of each month, visit You Can Grow That! to discover what other garden bloggers are growing.

Happy winter gardening!

XO ~

Julie


Monday, October 25, 2010

Rainy days and Mondays...

It's Monday. It's a rainy, gloomy Monday. The sky is gray, the yard is Carolina mud red, and soon, my pups and carpet will sport that lovely orangish-brownish tinge. I had such plans for today. I was going to plant my large kitchen garden, incorporating tulips, daffodils, and Dutch iris bulbs throughout the edibles so that I'd have an endless supply of my favorite spring flowers. Instead, I'm fighting the urge to curl up on the couch with my blanket and take a nap.

Honestly, the only thing keeping me from the nap is the chance that Peter might come home for lunch. I think he has a meeting, but I'm not going to chance it.

Rather than endure potential ridicule from my hubby (which would be well-deserved), I'm contemplating a clean-up. Truly, our house is bursting with junk. We're starting a remodeling project soon, but first we need to purge. Add into the equation that I'm room mom for both Kristen and Michael's fall parties on Friday, and I'm overwhelmed with plastic pumpkins, construction paper, and bags of candy. Really, what was I thinking? I need a clone.

OK. The house is too overwhelming. I don't know about you, but whenever I spend hours de-cluttering, the kids manage to re-clutter it within about 20 seconds. I don't think I have the patience for wasted work today.

Instead, I thought I'd share one of the few spots that is (currently) perfectly organized.

The potager.


C'est joli, n'est-ce pas?

A potager, for those of you who avoid pretentious gardening terms, is simply an organized kitchen garden. Pronounced “puh ta zhay,” the potager design precedent is from the Gardens of the French Renaissance and Baroque Garden eras. Often flowers, both edible and non-edible, as well as herbs are interplanted with vegetables and fruit to enhance the garden's beauty. (Plus, the flowers attract beneficial insects.) The potager is aesthetically pleasing but also functional. From formal knot gardens to cozy cottage gardens, potagers vary in size, shape, and design.

I'm addicted to garden magazines, particularly ones that showcase gorgeous, perfectly constructed edible gardens. The most recent edition of Mother Earth News is a perfect example of gardens that make me weep with their perfection. I buy gardening magazines obsessively, determined that our kitchen gardens will be lush, perfect. 

But it's not always easy to achieve my goals. 

Did you see the movie It's Complicated? I watched the scene which showed Meryl Streep's impeccable kitchen garden at least a dozen times, taking notes on what the set designers were growing in that gorgeous potager...until I realized that they had tomatoes and cabbage growing at the same time.  Later, I read that the tomatoes were actually wired to the vines to ensure the perfect garden specimens. 

Ah, Hollywood. How you torment me.

Our potager originated from my desire to design a formal vegetable garden close to the house, while attempting to hide the backyard damage caused by our dogs. Sun is scarce in our yard, which makes growing grass a challenge. Add into the equation two puppies...


...who use the backyard as their personal race track/agility course, and suddenly—there's no vegetation in site. So, last autumn, I persuaded Peter to build a potager in the midst of the mud—but where there's a patch of sun. He loves when I have brainstorms, really, he does. I'm sure of it, no matter how often he rolls his eyes. It challenges him to take my fantastical, seemingly simplistic (to me) ideas and turn them into reality. Honestly, how long could it take to whip together the basis for a kitchen garden?

Well. With my Swiss husband, precision isn't good enough. Perfection is the standard.

I must admit, I've learned a thing or two from him about planning. First, he drew a design, measured and marked off the shape of the garden.


Next, he enclosed the area with easy-to-install fencing that we found at Lowe's. The fence serves an obvious purpose...keeping Sophie and Chloe from racing through the garden. It also provides support for vertical growing. In the spring, peas climbed the fence, while this summer it supported tomato plants and beans.

After enclosing the space, he began outlining the beds with stone. We then filled each quadrant with compost and soil. 


Finally, he installed a stone base for the large container and filled the paths with pebbles.

Now, it was my turn.

My first step was to decide what my family would eat, because I wanted to involve the kids in growing food and eating from the garden. Unfortunately, our children are vegephobes. I know my parents are enjoying a good chuckle over this while they drink their Bloody Marys in the great beyond, as I was the worst, pickiest eater. My childhood vegetable repertoire consisted of plain Iceberg lettuce (no dressing), corn, and potatoes.

My children follow in my footsteps. Sorry.

So, to encourage the kids, I planted a border of strawberries in the potager, which was a hit. Obviously, the strawberries are a permanent garden fixture. Various lettuce and spinach plants were added, as well as radishes and a border of violas. 


The first season was OK. It didn't meet my expectations for a lush, bountiful, beautiful kitchen garden, but we did have an excellent harvest of strawberries and lettuce.

This fall, I became a little more thoughtful in my approach. I even made a plan.


It's highly professional, don't you think?


First, I cleaned up the remaining tomato plants and most of the peppers from the summer garden. I honestly don't have a good photo of the summer potager, because it quickly became overrun with tomatoes and, frankly, was just unattractive. So much for my desire for an organized, aesthetically pleasing garden space. It produced well, though. I also pulled up the basil and froze it for future pesto.


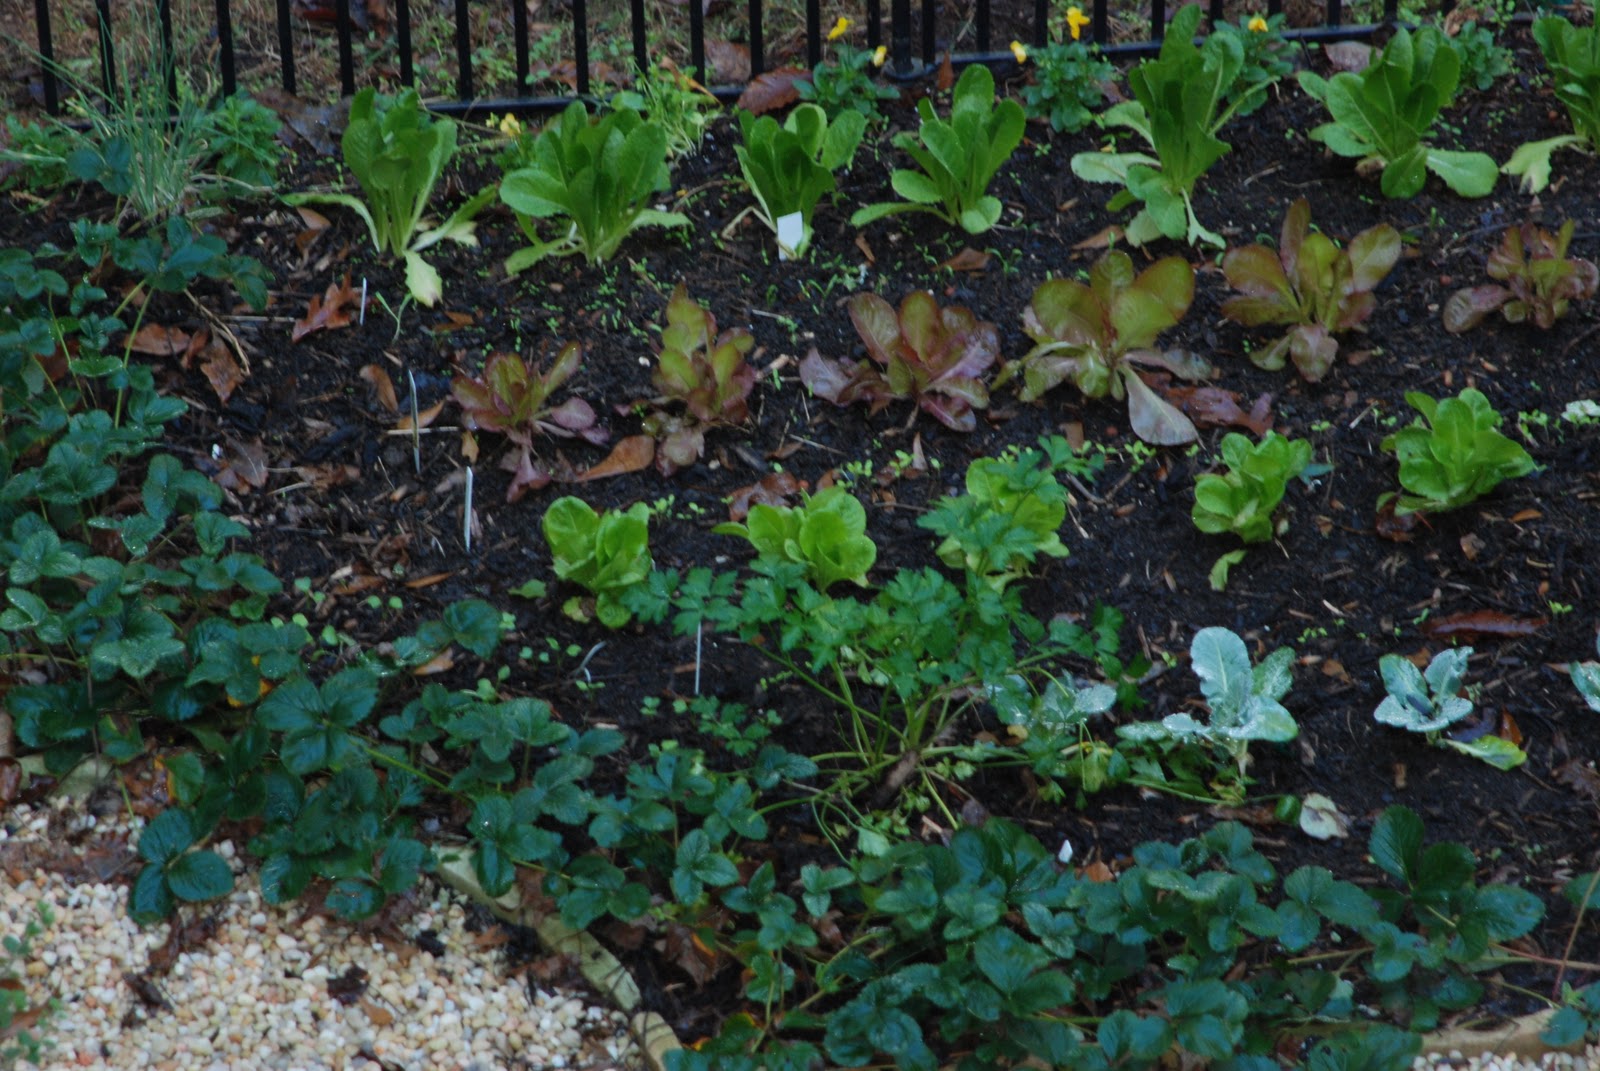
For our 2010 fall planting, I started with some transplants—red and green romaine lettuce, bibb lettuce, cauliflower, brussel sprouts, pak choy and chives. Yellow violas provide an edible flower border inside the fence.

Once the transplants were in place, I selected several varieties of heirloom lettuce, spinach, and radishes to direct sow:

Lettuce
Sanguine Ameliore
Lollo Bionda
Forellenschluss
Amish Deer Tongue
Lollo Rossa
Brune d'Hiver

Spinach
Merlo Nero Spinach
Bloomsdale Long Standing Spinach

Radish
French Breakfast Radish
Cherry Belle Radish


(You can see the seedlings emerging in the rows between the transplants.)


Also, I started some additional seeds under lights to transplant out later:
Violette Italia Cauliflower (purple)
Giant of Naples Cauliflower
Romanesco Italia Broccoli
Calabrese Green Sprouting Broccoli

Added to the center container of Greek oregano, persimmon, and lemon thyme were several lettuces and violas.


I must admit—I'm pretty happy with the potager so far this fall. I planted a little later than I planned, but the plants are growing well, and the seedlings are looking good. I'm hoping to get out tomorrow and thin the seedlings.


Wait.

What's that? In the back corner.

I didn't plant those.

ACK. Those are definitely NOT spinach seedlings.

So much for my little bit of organization...the weeds are taking over. Just like the clutter in the house.

Sigh.

(Still, I'd rather pull weeds any day than clean the house...)

The rain is gone. I suppose I'd better tackle those weed seedlings so at least something in my life is organized.

So much for that nap...it's time to fight weeds. Wish me luck. Please?
 
Are you growing any cool season crops? What and where are you planting? And--have you had the first frost in your zone yet?


I hope these babies make it through the winter...

Happy gardening!