Tuesday, January 15, 2013

Baking Baguettes.


I love to bake. While daily cooking tends to be a necessary evil for me, baking is a pleasure. It demands full attention--read a recipe, follow directions, et voilá! Deliciousness. No one complains when you bake a chocolate cake. No one makes faces when forced to eat apple pie. And no one ever complains about the smell of fresh bread lingering in the house.

With the constant rush to make something semi-healthy for dinner that everyone will eat, daily cooking is a frantic, hurry-up-and-get-it-done stress.

But baking?

Baking is intentional. Baking is relaxing.

Baking is celebratory.

But baking bread? Now, that makes me nervous.

Peter is our bread baker. He magically crafts scrumptious, braided loaves of “Sunday Bread,” as he calls it, using a recipe hand-written in Swiss German. It's a treat when he makes bread, but it's a treat that doesn't last long. We can easily polish off a loaf of bread in a few hours, especially if Tyler is home.

There's something very romantic about baking bread. I'm sure my grandparents would roll their eyes at my romanticizing bread making, since it was a daily chore for them. Still, the vision of crusty baguettes eaten warm from our oven often occupies my thoughts. Surely, it couldn't be that difficult. 

Right?

So, when my new friends at Farm Chick Chit Chat introduced a bread baking blog party, I decided it was time to embrace the art of baking bread.

The bread of choice for my experiment?

Baguettes, of course.


A year ago, I requested The King Arthur Flour Baker's Companion for a Christmas gift. It's 620 pages of intimidation. For instance, on page 239, you'll find this reassuring bit of baguette wisdom:

Let this recipe be the starting point on a journey that may last for quite a long time—the 'perfect' baguette is a serious challenge for the home baker.”

Huh.

Excuse me, I'd rather have a fool proof recipe, please—one that's going to work the first time out. Please, Mr. King Arthur, sir?

Anyway, I refused to be intimidated by a bit of flour, water, salt and yeast.

There was no turning back.

First, though, as a bread baking novice, I needed to figure out a few technical details.

Like what the heck is a poolish? Am I the only one who doesn't know what this is?

In case you, too, wondered...it's simply a type of starter that's based on equal parts (by weight) flour and water with a touch of yeast. It's used to enhance the flavor of the baguette. Then, when making the dough, the same amount of water is used with double the amount of flour. According to my guide, it's the “classic French proportions for a baguette.”

Oh lá lá! C'est manifique!

Baguettes

Ingredients
Poolish:
1-1/4 cup (5-1/4 ounces) unbleached all-purpose flour
2/3 cup (5-1/4 ounces) cool water
1/8 teaspoon instant yeast

Dough:
Generous 2-1/2 cups (10-1/2 ounces) unbleached all-purpose flour
1-1/2 teaspoons instant yeast
2 teaspoons salt
2/3 cup (5-1/4 ounces) cool water

Poolish:
  1. Combine the flour, water, and yeast in a medium mixing bowl. Mix until just blended.
  2. Let the mix rise for 12 hours or so. It should look spongy and aerated. It should be at peak flavor just before it starts to fall, so try to use it before its descent.
Dough:
  1. Place the flour, yeast, and salt in a mixing bowl.
  2. Add the poolish and water.
  3. Mix the dough until it's just cohesive, approximately 30 seconds.
  4. Cover and let dough rest for 20 minutes.
  5. Knead the dough, using a mixer or your hands, until it's elastic but not perfectly smooth. The surface should still be a bit rough. You aren't kneading it thoroughly, because as it slowly rises, the gluten continues to develop. Too much kneading equals an “unpleasantly stiff” gluten during the long rise. (Seriously. Unpleasantly stiff. It's in the book.)
  6. Transfer the dough to a lightly oiled bowl. Cover the bowl and let the dough rise for two hours, folding it over after the first hour. Folding helps strengthen the gluten. To fold the dough, lift it out of the bowl, gently deflate it, fold in half, and place back in the bowl. Folding expels the excess carbon dioxide and redistributes the yeast's food.
  7. Divide the dough into three pieces and form them into rough logs. Let them rest for 20 minutes.


  8. Shape the logs into long, thin baguettes.
  9. Proof the baguettes, covered, in the folds of a linen or cotton couche, until they are puffy—about 40 minutes. (Yes, I know...I had to look up “proofing” and “couche.” A couche is a rectangular piece of cloth that can cradle multiple rising baguettes in its folds, helping the dough retain its shape. To proof is to cover the dough, allowing it to rise. Clear acrylic proof covers are designed to cover the rising dough, but you can also use a wet towel or plastic wrap, as long as it doesn't stick to the dough and deflate it. I used a wet towel, held aloft by four glasses on either side of my parchment paper “couche.” Creative baking for the bread-tool challenged...)


  10. Preheat the oven and baking stone to 500 degrees. The stone helps create a crispier crust, but you can use a pan.
  11. Using a sharp serrated knife, make four diagonal cuts in each loaf, at a 45 degree angle.
  12. Spray the loaves with warm water to help replicate a steam oven.
  13. Place the loaves on the stone in the oven.
  14. Reduce the heat to 475 degrees and bake the loaves for 20 minutes.
  15. Remove the loaves from the oven when they are golden brown, and transfer to a wire rack to cool.
  16. Allow loaves to cool completely before cutting, otherwise the texture might be gummy, since they will contain moisture that migrates out as they cool.
As I pulled the loaves from the oven, my first thought was--

...those are some seriously homely baguettes.

In fact, I wrote off the baguette experiment as a failure.

But then, I decided that I needed to try a tiny piece.

And you know what?

It. Was. Good.

Ugly, but tasty. The crust? Crispy. The interior was flavorful, but a little too heavy.

For a first try—it wasn't too bad.

When I finally went to bed at 1 a.m., Peter—who I thought was asleep—got out of bed to try a piece, enticed by the smell lingering throughout the house.

And he liked it!

It really did smell amazing.

In fact, everyone seemed to deem my experiment a success. From the three loaves, this is what remains (less than 24 hours later—and Tyler isn't even home from college):


So, it's true. The “perfect” baguette eluded me this time, but I baked some pretty darn good bread.

I will master the Art of French Baking.

I will.

Happy baking to you!

XO ~

Julie

Counting the Days Until Spring (62!)--Garden Bloggers' Bloom Day.

It's coming. 

Only 62 more days of dank, gray, depressing nastiness.

I know I shouldn't complain. After all, we sweated on Sunday, with the temperatures hitting mid-70s.
 
And I know you northern friends are rolling your eyes at me. I remember those lovely days of -50 degree wind chill and salt-stained boots. 

If we'd just have a little burst of sunshine, I wouldn't complain. I promise. 

The grayness and the rain are just making me feel...moldy. Lethargic. Sluggish.

Still, I know spring lurks just out of reach.

Look what I found!


The first snowdrop! Isn't it the most cheerful little bloom? I adore its lack of pretension. I especially love how easily you can miss the secret little green heart hidden within. Do you see it?


Closely followed by the first snowdrop, the hellebores began their lovely display. Thank goodness for hellebores. In the midst of the oppressive grayness of January, when everything is bare, dank, muddy, and stagnant, hellebores quietly unfurl, providing the pop of color and bit of hope winter gardeners crave. 


What a work horse. 


Particularly in our shady gardens, hellebores provide lovely color, as well as year round interest with their evergreen, serrated foliage in zone 7b. 


Plus, from the five original plants I purchased approximately 10 years ago, we now have more than 100 hellebores scattered throughout our shady yard. I'm often tempted by new, stunning hybrids when I browse through some of my favorite catalogs, but these originals always remind me that newer isn't always better. (Although, after reading my friend Helen Yoest's article in Country Gardens magazine about Pine Knot Farms hellebore nursery, I'm secretly drooling over the lush fields of flowers.)

I've also seen hellebores used in many of the trendiest floral studios, like Saipua. If you need a dose of sheer, awe-inspiring beauty, check out Saipua, as well as Floret Flowers. These women produce amazing work. 

I need a flower farm. Sigh.

As I tried to get a better angle for the hellebore photos, Oreo decided she needed some love. 


She really is part dog. Truly, how many cats come when called, stand on their hind legs to be petted, and follow you to the bus stop? (Just don't tell her I called her a dog.)


My love affair with fraise des bois continues. Mid-January, and look--blooms. We'd still be eating berries if we hadn't experienced two weeks of freezing evening temperatures earlier this month. Everyone needs fraise des bois in their gardens. Yes, you do--trust me.


The daffodils are ready to pop. Is there anything more cheerful than daffodils? My mom used to buy a 10-stem bunch of daffodils from the grocery store for $1.99, just to brighten the kitchen table. When I began working, I always kept a vase of daffodils on my desk during the sad Chicago winter. Daffodils make me happy.


New to the garden last fall, the witchhazel buds are about to burst. I'm excited to see how it performs, plus I can't wait for its fragrance to grace the garden.
 

One of my favorite fragrant bushes is winter daphne. We're often warned that daphne is temperamental when planted in garden beds, so I chose to plant ours in containers near the front entrance. I'm anxiously awaiting its sweet, welcoming greeting. It's so close, I thought for certain it would be blooming in time for GBBD.

Patience. Not my strong suit.


Kristen's cherry tree continues to bloom...and bloom...and bloom. A few flowers here, a few there. It's been non-stop since autumn, but just piddly little blooms. I envisioned a cherry tree overwrought with blossoms. Lesson learned. This photo is a good example of how dreary the days are--nothing but gray.


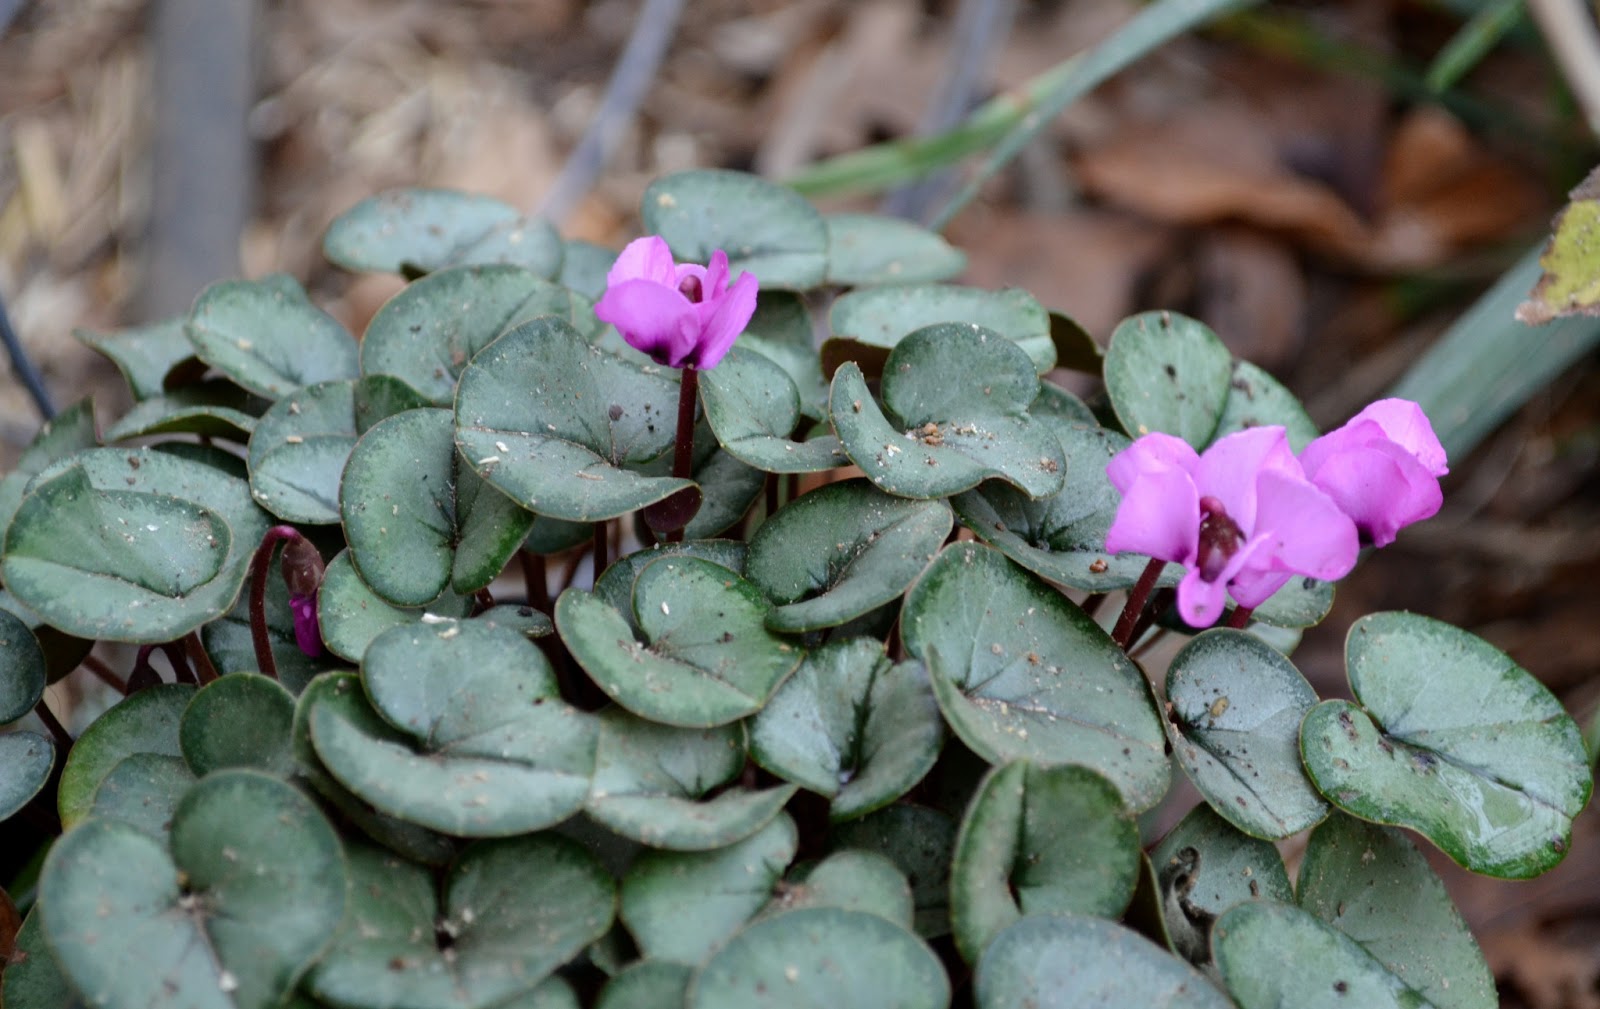
I'm excited about a few new blooms added to the garden. Somehow, I never planted hardy cyclamen in our shady garden. What was I thinking? I definitely needed to rectify that mistake.
 

Not only do the blooms add a nice pop of winter color, but the foliage is showstopping. 


The tea olives continue to do their duty, offering a bit of fragrance from their diminutive blooms.


While I scouted for blooms along the pool, Sugar came looking for a treat. Poor girls, their run is a muddy mess after today's rain.


Our edibles continue to produce well. I thought the mushroom logs would be dormant for a bit, but we're still harvesting mushrooms regularly. I need to bump up my mushroom recipe repeteriore.
 

Ah, camellias...they never disappoint. While they've already put on their big show, a few encores remain.


On New Year's Eve Day, our family visited a local nursery, where we all received coupons toward plants and merchandise. Mikey selected a camellia, which he insists must be planted right outside his window.

I'm negotiating. If I plant it right outside his bedroom window, it will be in the middle of boxwoods and azaleas. 

Not exactly ideal. 


Of course, our gloomy days always get a reprieve with pansies and violas. Their cheerful little faces brighten January days. I've loved pansies since I was a child, except that we planted them in the spring when we lived in Indiana.

 
Our typically cheerful blooms looked tired today, drooping under the weight of rain.


The violas, though, still provide a burst of perkiness.

As I've mentioned a time or two, I'm a hopeless failure with house plants. However, I'm determined to keep alive the two lovely orchids I received for Christmas from my family. 


I will. I will!


I do manage to keep forced bulbs healthy throughout the holidays, at least. 


Paperwhites are so simple to force, and the variety I purchased had a nice, subtle fragrance--not the typical sickeningly sweet scent.  


And finally, finally...my amaryllis bulbs began blooming--yesterday! Just in time to share for Garden Bloggers' Bloom Day.

So, only 62 more days until our gardens will be filled with blooms. Until then, I'll be heading over to May Dreams Gardens to see what my garden blogger friends found blooming in their gardens.

Do you have any blooms to share?

Happy Bloom Day!

XO ~

Julie 

Friday, January 11, 2013

Kale Fail.


Our winter gardens amaze me—lush chard, spicy arugula, colorful radishes—all thanks to our simple homemade low tunnels. Granted, the lettuce is a little limp right now due to some extremely cold nights, but the rest of the garden is right on track.

And the kale is a show stopper.

Isn't it pretty?

Like most mothers, I'm constantly battling our children's taste buds. I try to feed them healthfully—we obviously grow enough organic produce to ensure their nutrition—but actually getting the food down their throats is another matter.

Admittedly, I grew up as the world's pickiest eater. As the fourth of four children—and a surprise addition--my parents never forced me to eat my peas. Or carrots. Mom and Dad were too tired to sit at the dinner table with me until 9 p.m., as they often did with my siblings (or so I've been told.)

So, although I'm determined to get the kids to eat more veggies, I'm also a realist. I look for ways to trick them into eating veggies.

Like kale chips.

Salty, oily, crunchy—it's the perfect snack alternative to Pringles.

Right?

Plus, if kids help grow the produce, they're more likely to eat it.

It's true. I've seen it.

(Just not, necessarily, with our children.)

So if you, like me, resolved on January 1 to feed your children—or yourself—more veggies, adding kale to your garden and your menu is simple.

Grow.
Kale is a cool season crop whose flavor improves when exposed to frost. It's a hardy biennial, meaning that it takes two years to flower and complete its life-cycle. Most of us, though, grow kale as an annual. In our zone 7b garden, it thrives throughout the winter.

Kale prefers loamy, well-drained, moist (but not soggy) soil of average fertility, with a pH of 5.5 to 6.8.

Plant kale in early spring, four weeks before the last frost, in full sun. You can also plant kale in partial shade in hot climates. In mild climates, kale can be grown year-round. I planted ours in October.

Space plants six inches apart. Side dress throughout growing season with organic liquid fertilizer, such as fish emulsion. Keep kale evenly watered.

Kale flourishes with companion plants such as beets, celery, herbs, onions and potatoes, but it does not enjoy beans, strawberries or tomatoes. Aromatic plants, like chamomile, mint, oregano, rosemary, sage, thyme, and wormwood, repel cabbage fly and cabbage worm. (Note: mint can be invasive and take over your garden! Plant in pots near the kale to help prevent unruliness and keep pests away.)

If you'd rather grow kale from seed, start the seeds five to seven weeks before the last expected frost. If you’re direct sowing, plant the seeds outside two to four weeks before the last frost in spring or anytime at least 10 weeks before the first frost in fall. Whichever season you choose, the soil temperature must be at least 40 degrees or higher for good germination. Kale germinates best in soil that is approximately 70 degrees.

Harvest.
Begin harvesting kale approximately eight weeks after sowing. Small, tender leaves are great for salads. For cooking, harvest six-inch outer leaves, leaving the center leaves to continue growing.

Hot weather produces bitter, tough kale. You don't want to use this fresh--instead, you can add it to dishes and soups, cut into small pieces. 


Eat.
Kale can be braised, sautéed, or eaten raw. It's also delicious in soups. I may try kale potato soup next. I think I saw a recipe in one of my Alice Waters cookbooks. Hmmm.

Kale chips are extremely easy to prepare. The most time-consuming task is washing and drying the kale.

Kale Chips
Ingredients:
10 large kale leaves, washed and completely dried.
Extra Virgin Olive Oil
Sea salt
  1. Preheat oven to 300 degrees.
  2. Wash kale leaves, drying completely. I used both a salad spinner and paper towels to dry the kale. Make certain that the kale is thoroughly dry, because any remaining moisture will produce steam in the oven, resulting in limp kale chips.
  3. Tear kale into bite-size pieces. Remove the tough stem.
  4. Place kale in single layer on a baking sheet.
  5. Drizzle extra virgin olive oil over the kale. Massage the oil into the kale with your fingers to thoroughly coat the leaves.
  6. Sprinkle sea salt over kale. You can experiment with other spices, like garlic salt, cumin, or red pepper flakes, but I needed to keep it basic for my kiddos' palates.
  7. Place in oven and bake for 15 minutes or until crispy.
  8. Cool and serve.

The crispy, curly edges of the kale literally melted in my mouth.

While I liked the kale chips, the big test awaited the arrival of the school bus.


(I didn't get a photo of Mikey trying his kale chip. This was his reaction when I asked him to try it one more time.)

Kale fail.

Honestly, what am I going to do with these children?

Ideas? Suggestions?

Do you--or your kids--eat kale chips? Do you force feed your loved ones veggies, or do you hide them in things like chocolate brownies? 

Please...do share.

Back to the drawing board...and garden. There must be something besides cucumbers and corn that these kids will eat.

Happy Friday!

XO ~

Julie, the highly frustrated organic veggie grower


Friday, January 4, 2013

New Year's Resolution: You Can Grow That!


The weather outside is frightful, but I'll admit it—I'm spoiled. As a former northern girl, I'm in garden bliss living in zone 7b. In our little piece of garden paradise, Upstate South Carolina's moderate winters allows us obsessive garden types the opportunity to grow year around. With only a minimal investment of time and money, simple low tunnels keep us in produce all winter long. (See here.)

I've always planted fall crops of lettuce, Swiss chard, and spinach, but this is the first year I have three full raised beds crowded with cool weather crops, as well as a potager filled with deliciousness. Along with my tried and true crops, I added cauliflower to the mix.

Isn't it so pretty?

I hesitated to grow cauliflower. I heard stories that it's temperamental. Challenging. Bug infused. High maintenance.

But then, in the throes of garden center delirium, I purchased a few transplants.
  
And tonight, Peter and I feasted on homegrown cauliflower.

Isn't it amazingly satisfying to eat from your yard?

(Of course, Mikey believes we're trying to poison him after we insisted he eat one floret. I'm currently enjoying a glass of Beaujolais Nouveau as my rewarding for sitting at the dinner table for 30 minutes while he fussed and choked on the single piece of cauliflower. Yeesh.)

So, before you listen to the naysayers who tell you that you'll spend hours every day defending your cauliflower transplants from cabbage worms, let me assure you—you can grow cauliflower.

Here's how:

Grow.
Cauliflower is a member of the Brassica family and grows best in a rich, well-drained soil. Keep pH at 5.8 to 6.5. This cool season vegetable prefers averages temperatures of 60 to 65 degrees. Plant early enough in the season to harvest before temperatures become too hot, or in my case—plant in the fall if your winter is mild or you can install low tunnels to protect the plant from freezing.

Space cauliflower in rows that are three feet apart and 18 inches between plants to allow for adequate growth. Water deeply—light watering will encourage shallow root development. Keep consistently moist.

Cauliflower is a heavy feeder, and nitrogen is important for the plant to produce a good crop.

To ensure the visual appeal of your cauliflower, it's best to shade the heads (called “blanching”) so that they don't become discolored. Some leaves may naturally grow over the forming head to provide shade from too much direct sunlight (which can also make the cauliflower taste bitter). However, a bit of gardener assistance is easy to provide. Gather outer leaves of the plant to join over the top of the head, then clip with a clothespin. After a strong rain, though, unclip so that water isn't standing on the head, which can cause rot. Allow to dry out, then cover the head again. A bit of discoloration typically doesn't affect taste, but too much heat and direct sunlight can affect taste.


Cauliflower grown in the fall garden tends to require less attention to pest control than spring-grown cauliflower. Honestly, I haven't picked one cabbage worm off of the cauliflower, but I know from experience with spring school gardens that you must be vigilant in warmer weather. Hand picking worms is the best organic method of control. (And kids love the challenge of finding the creepy critters.)

Companion planting can also assist in controlling pests that enjoy cauliflower. For instance, celery planted along with cauliflower deters white cabbage butterfly and cabbage worms. Aromatic herbs planted near the bed can improve the health and flavor of cauliflower and deters white cabbage worm by repelling egg-laying butterflies. However, please NOTE: Mint can be very invasive! Plant mint in a container and place near the cauliflower.

Additionally, the following herbs also benefit the health of cauliflower and other brassicas:

Oregano: Repels cabbage butterfly.
Rosemary: Deters cabbage moth.
Sage: Repels cabbage flies, black flea beetle, cabbage looper, cabbage maggot.
Thyme: Deters cabbage worm, white fly.
Wormwood: Repels animals in the garden when used as a border. Repels moths, flea beetles, and cabbageworm butterfly.
Harvest.
Harvest 60 to 70 days after planting transplants, when head is fully developed and before curds begin to separate. Leave a ruffle of leaves surrounding the head when harvesting to prolong freshness and quality. Store in the refrigerator.
Eat.
Soak cauliflower in cold water with a bit of salt and vinegar to flush out any aphids. For quick cooking, separate the head into florets.

Cauliflower can be eaten raw, steamed, stir fried, or in soup.

We tend to simply steam cauliflower or eat it raw. But homegrown cauliflower really deserves more attention, perhaps a celebratory soup for your success in growing cauliflower!

French Cream of Cauliflower Soup
From Chez Panisse Vegetables by Alice Waters
Serves 4 to 6

Ingredients:
  • 1 large cauliflower head (2 to 3 pounds)
  • 1 onion
  • 2 tablespoons unsalted butter
  • 4 tablespoons créme fraîche
  • Salt
  • Nutmeg
  • Chervil
  1. Cut off the stem of the cauliflower and any green leaves. Break up the head into florets. Wash them in cold water and reserve a few florets to garnish the soup.
  2. Peel and slice the onion thin. In a soup pot, stew the onion slices and the florets in the butter with a little water for 15 minutes, stirring occasionally, without letting them brown. Add water to cover and cook for 25 minutes, covered, over medium heat. Meanwhile, parboil the reserved florets in boiling salted water for 8 minutes or so, keeping them crunchy.
  3. Purée the soup in a blender and reheat gently to just under boiling. Add the créme fraîche and season with salt and nutmeg to taste. Serve the soup very hot, garnished with the whole florets and a few springs of chervil.
As you sip your delicious soup, aren't you glad that you grew cauliflower?

On the 4th of each month, visit You Can Grow That! to discover what other garden bloggers are growing.

Happy winter gardening!

XO ~

Julie


Tuesday, December 4, 2012

Dreaming of Spring...You Can Grow That.

While most of America scours sale flyers and races to malls in search of perfect holiday gifts, we gardeners anxiously await bargains of a different kind.


The end of season bulb sales.


It starts slowly with our favorite mail order nurseries. E-mails entice us, offering 20 percent off...30 percent...40 percent...sold! And because some overzealous gardener ordered thousands of sale bulbs last year...and then spent weeks planting them in the midst of the holiday season, restraint is in order. Just a few. 

A handful of species tulips...

...some snowdrops for the forest path...

...maybe a box of tulips to plant as a cutting garden. Oh, and a few species lilies to try, plus of course a few extra Casa Blancas. After all, Casa Blancas featured in my long ago wedding bouquet.

A girl can never have too many Casa Blancas.


Oh, wait. Let's not forget the important bulbs. Paperwhites to force for teacher gifts, and a few new amaryllis bulbs to sample...but only a few, because they're not on sale.
Not bad. In fact, when the shipment arrives, it's only one, medium-sized box. I congratulate myself on my restraint.

But then--disaster.

A quick trip to a big box store for a small potted evergreen requires a stroll through the garden center...

...where there are bulbs. Boxes and boxes of bulbs.


And they're 75% off.


I know what you're thinking. You're right.

I have no willpower.

Still, I challenge any gardener to pass up 75% discounted bluebells and tulips.

You know you can't.

(Right now, my husband is rolling his eyes as he reads this in Switzerland, where he's visiting his parents for the week. Because he's in Switzerland and I'm home with the kids, I feel completely justified in my purchase.) 265 bulbs for--wait for it--
$17.94.

I promise you, my friends, these are not disease infested, moldy, shriveled up bulbs. They're plump, lush, and filled with potential. Yes, they're a little smaller than my mail order beauties, but they'll do just fine.

Most of my purchases will find homes in the perennial beds, but a few varieties that are more shade tolerant and deer resistant will be incorporated into the forest paths. Plus, a few will remain indoors for a bit of color during the gloomy winter days.

Bulbs are brilliantly easy: dig a hole the depth according to the directions on the package. A good rule of thumb is to dig a hole to a depth of approximately three times the height of the bulb. Then plant the bulb pointy side up.

Simple.

Over the years, I've learned a few things that can help make your bulb planting easier and more successful.

Plant in clusters.

By grouping bulbs, you'll make a more dramatic show in your garden—and you can dig one very large hole for many bulbs as opposed to lots of time-consuming individual holes. Who doesn't like to save time and create a better design impact? 

Plant in layers.

If you purchased several varieties of bulbs that bloom at different times, such as crocus and tulips, dig a large, deep hole. Plant the tulip bulbs first, as they require additional depth. Partially backfill soil into the hole, then plant a layer of the smaller crocus bulbs. Fill in the remainder of the hole with soil. You'll have a lovely, continuous display of blooms throughout the spring.

If you have a choice in sale bulbs, choose varieties that flower in intervals. Tulips, for instance, include early, mid, and late-flowering varieties. Select some from each group for continuous blooms. 

Don't make bulb soup.

Good drainage is a must. Otherwise, all of your efforts will simply rot away. 

Beware the nasty vole.

The vole is my nemesis. Garden cats tend to help alleviate the problem...unless they turn into spoiled, overfed, lazy fluff balls like our Sammy and Oreo. We love them, but the kids feed them too many treats for them to be inspired to hunt. Voles will devour your tulips and snack on your lilies.

It's infuriating.

Don't bother with vole-repellant products. I've tried all organic remedies, and honestly—the bobcat urine was like adding salad dressing to the hostas. I'm sure the poison bombs probably work—but they're not happening in our gardens.

What I have found, though, is that a little extra prep work when planting can help alleviate some of the vole destruction.

Apparently, voles don't like to cross anything sharp in the soil. After you've dug your holes for your bulbs, line the bottom and sides of the hole with a layer of sharp gravel or perlite. Place a bit of soil on top, then add your bulbs and cover with soil.

I've succeeded in saving bulbs from becoming vole midnight snacks by using the gravel. It's worth the extra effort and small expense. Trust me.

After all, you know you're going shopping tomorrow so you can pick up some stunning Star of Persia Allium or Checkered Lily Fritillaria, and maybe some Ice Follies daffodils or a few Lady Jane species tulips.

All for 75% off. You know you can grow that!

Just wait. Your garden will be bursting with color next spring.

For more gardening how-to, check out these fabulous ideas from garden bloggers every 4th day of the month at You Can Grow That! 

Happy planting!

XO ~

Julie


Monday, December 3, 2012

Tarnished Angel.


It's been a crazy few days, celebrating hubby's very significant birthday on Friday followed by a mad dash Saturday to deck the halls before he left for a week in Switzerland. Today, when I should have been writing, I attempted to restore order to the house. Really, the Christmas decorations seem to breed each year, and I wind up with a pile of odd Santas and candles that have no home. 

Also, can someone please explain to me why every year I must make no fewer than two trips to Target in the midst of decorating to replace lights? 

Honestly, nonworking lights turn me into the Grinch. Normally, Peter claims that title. There's nothing festive about half-lit strands of lights that need to be removed from wreaths or garland and replaced with new lights that must be woven throughout the greenery. 

Grinch, Grinch, Grinch.

After much non-festive muttering and worse, I'm afraid, the outside lights are up and working, the tree is dripping in LED colored lights that make our living room look like a disco, and every branch of the 9.5 foot behemoth Fraiser Fir droops with treasures. 

We don't do decorator trees. Our tree is filled with handmade ornaments: clothespin reindeer and painted puzzle-piece toddler ornaments. Bells from Switzerland. Sparkly glass balls from vacations. Tacky, "back of the tree" ornaments. Ornaments showcasing each child's passion--music, Star Wars, horses, chickens, Madeline, Barney. Sailing ornaments for Peter, a tomato ornament for Garden Delights. Photos of a baby that is now a 21-year-old adult. And, like the ornament that occupied the place of honor on my family's tree as we grew up, a teapot resides just below the star. Our glass teapot ornament is everyone's favorite.

Our ornaments evoke memories, each one with a story to tell. I received the brass angel (above) when I was in second grade from my (now former) sister-in-law. Somehow, this little engraved angel meant the world to me--possibly because, being much younger than my siblings, I felt invisible. My sister-in-law talked to me like an adult, showing genuine interest in my crazy passions. I rarely saw her without a book in her hands, and she encouraged my book obsession. That same Christmas, she gave me The Secret Garden. Honestly, how could I not adore her? 

Life happens, people change. I saw her a few times after the divorce, but she remarried and we lost touch. It's one of my great regrets. I would love to know her now, as my adult self.

But every year, when I unwrap the little angel, I think of her. It's the one ornament that I insist only I can hang on the tree.

It's tarnished now, a little rusty along the back, aged like its owner.

But in the dark, reflecting the disco lights, it shines with possibilities.

It will never be banished to the back of the tree.

XO ~

Julie


Sunday, December 2, 2012

Happy December to You!


Happy December to you! Chicken Mama is busy, dressing her girls in their holiday finery, and I'm tackling the leftover mess of yesterday's marathon decorating session. Still, in the craziness that is December, I'm planning to play along with the December Photo Project. 
 
We'll see how it goes...want to play along, too? Just visit this link to sign up. From what I gather, there are no rules--just take a few moments each day to regroup and play with your camera. We all need a little creative diversion this month, don't you think?

Happy Sunday! 

XO ~

Julie

DPP Banner 500 x 360