Showing posts with label You Can Grow That. Show all posts

Tuesday, November 12, 2013

Growing Autumn Bouquets.

Once upon a time, when I nervously signed the mortgage for my first house, I didn't rush to Pottery Barn or Crate and Barrel. Drapes that puddled perfectly on the floor or bird cages filled with plastic plants or funky plates with funky linens weren't on my wish list to make my new house homey.

Instead, I spent every bit of disposable income supporting local nurseries.

camellia, http://growingdays.blogspot.com
For me, the happiness of becoming a homeowner meant that I'd finally, finally have a garden. Of course, I wanted a lovely, lushly landscaped garden--but its primary purpose was to fill my new home with fresh flowers. Never again would I wait for someone to bring me a sad, tired vase of ugly red roses. (Please note: this was pre-Peter. He possesses great taste in flowers.)

Honestly, is there anything nicer than a just-picked, fresh-from-the-garden, cheerful bouquet of flowers to make a home feel warm and vibrant? 

No. No, there's not. Well, OK, kids and significant others and furry babies are also high up on the list, too. The smell of apple pie baking also helps. Still, flowers will always be right up there in their ability to make a blah Wednesday feel like a celebration. Plus, as much as I love fresh flowers in our home, I love sharing them even more. It's pure happiness to watch a friend receive a bouquet, because flowers make every day a little brighter.  

Lately, though, I've spent more time obsessing about growing edibles to feed my family than remembering why I originally loved gardening. Plus, it's November. The garden looks...uninspiring. It's easy to snip some tulips in spring or arrange tea roses in summer. In fact, I planned a cutting garden for spring and fall blooms, which you can read about here. In fall, though, my attention turns to seed catalogs and bulb orders. I know it's trendy to proclaim fall as everyone's favorite season, but for me? Nope. No, thank you. Bring back my sunshine and pretty spring blooms, pronto.

So, when the fearless leader of You Can Grow That!, C.L. Fornari, challenged our group of garden bloggers to write about giveaway bouquets, I pushed aside my seasonal affective disorder and took a stroll around the garden to see if I could find anything--anything remotely attractive or alive--that would contribute to a bouquet.

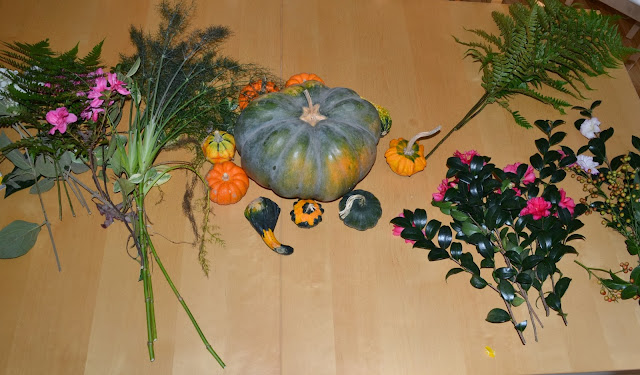
Surprisingly, I returned with arms full of material. 

making autumn bouquets, http://growingdays.blogspot.com

camellias, berries, autumn fern, http://growingdays.blogspot.com

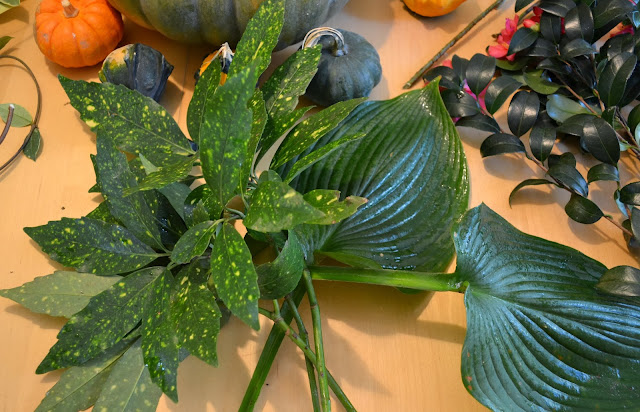
autumn bouquets, hosts, aucuba, http://growingdays.blogspot.com

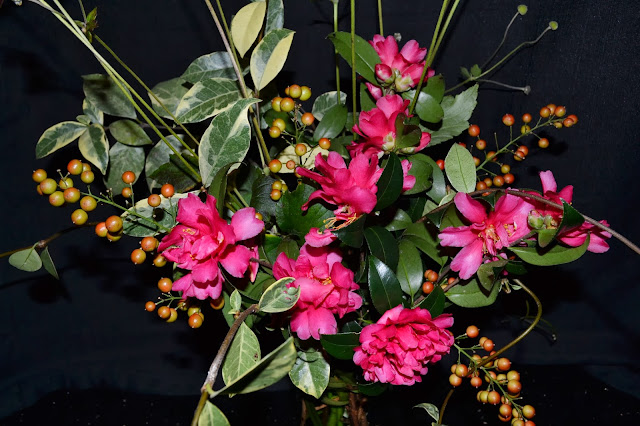
Our camellias, hidden on the south side of the house, are heavy with blooms right now. Sadly, I tend to forget about them, because they aren't along the path I normally take to the kitchen garden. I plan to propagate some of these beauties and plant them in a more visible section of the garden, because they are the perfect fall flower.

camellia, http://growingdays.blogspot.com

camellia, http://growingdays.blogspot.com

viburnum, http://growingdays.blogspot.com

The viburnum, however, continues to produce a spectacular, eye-catching show all fall. During spring, these two bushes brighten the back garden with their enormous blooms. While fall blooms aren't nearly as prolific, I still found plenty of flowers, although they were beginning to look a bit tired.

Because blooms are scarce during November, foliage needed to play an important part of the bouquet design. Fortunately, we have lots of variegated vines, hostas, and ferns. Even 'Gold Dust' aucuba participated in the November bouquet project.

foliage, http://growingdays.blogspot.com, variegated ivy

Herbs and berries also made an appearance in the bouquets. While I intended to use bronze fennel, some little creature had eaten most of it. Instead, the airy branches of Florence fennel added a frothy texture, as well as height, to an arrangement. Encore azaleas, a bloom that I never considered for bouquets prior to our assignment, was also added to the mix.

fall bouquet, fennel, gold dust aucuba, Encore azaleas, http://growingdays.blogspot.com

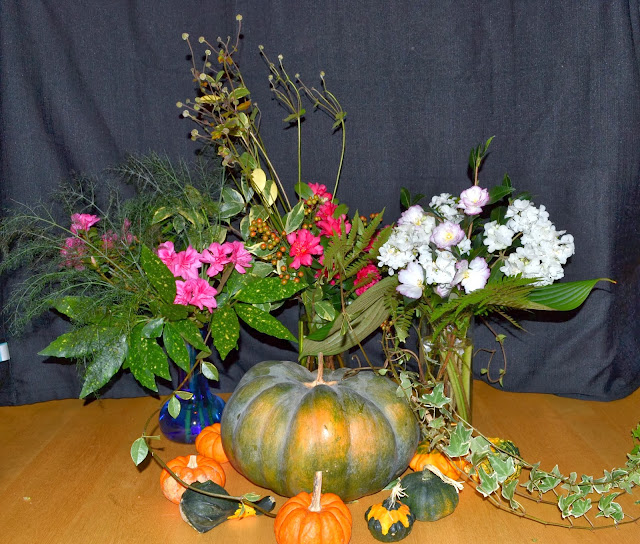
After I cleaned the foliage from the bottom portion of the stems and sorted the cuttings, I realized that I'd gathered enough materials to make not one but three bouquets.
 
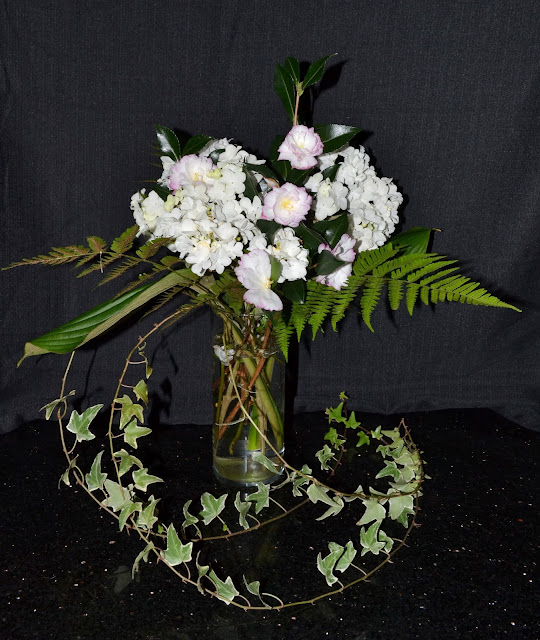
all bouquet, camellia, autumn fern, variegated ivy, http://growingdays.blogspot.com

Pale pink camellias, viburnum, autumn ferns and variegated ivy.
 
camellias, viburnum, fern, http://growingdays.blogspot.com

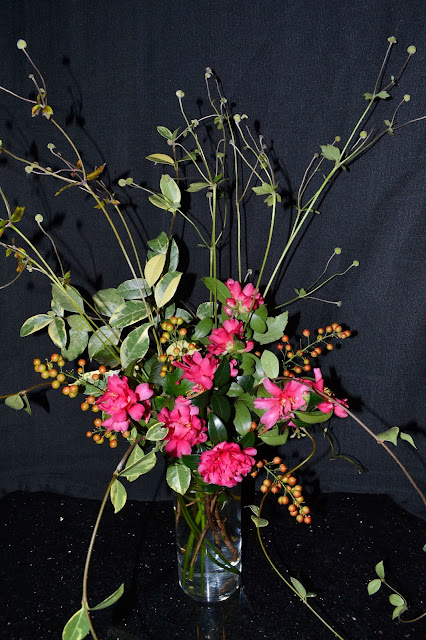
Japanese anemone, camellias, berries, http://growingdays.blogspot.com
Seed heads from Japanese anemone, camellias, Hearts-A-Bustin' berries, 
and variegated potato vine.

Hearts-A-Bustin berries, cammellias, potato vine, http://growingdays.blogspot.com
 
Encore azalea, fennel, Gold Dust aucuba, http://growingdays.blogspot.com

Encore azalea blooms, 'Gold Dust' aucuba, and Florence fennel.

Encore azalea, fennel, Gold Dust aucuba, http://growingdays.blogspot.com

Fall bouquets, http://growingdays.blogspot.com

My bouquet making skills need more practice, but it inspired me to remember my first garden and the passion I had--for flowers. Of course, I'll continue obsessing about our edible gardens and native plants, but I'll also keep searching throughout all seasons to bring the garden inside and share it with friends.

What flowers do you enjoy receiving in your favorite bouquets?

XOXO ~

Julie

Wednesday, October 2, 2013

Social Studies and Seed Saving.


Three Sisters Garden, http://growingdays.blogspot.com

As a gardener, I sometimes wonder why. Why am I so driven to tackle weeds, battle squash bugs, and fight the forest in its effort to reclaim our asparagus bed? As a mom, there are days when I wonder why I dragged the kids out to the garden, invading my garden zen with their complaints and fussing as they weed the strawberry bed. What's the point? We have an absolutely fabulous Farmers' Market nearby if I'm so determined to feed the family vegetables. 

Then, once in awhile, it all makes sense.

In South Carolina, third grade students study our state's history. Incorporated into social studies lessons is a student project about Native Americans of the Carolinas. Kids can choose to create a model of a tribe's home, draw a poster, or write an essay. (Truthfully, the term "student" should probably be substituted with "parent." Many overzealous parents build architecturally correct renderings of Cherokee, Catawba, or Yamasee homes. In fact, one student in Mikey's class grumbled that his mom only let him make the campfire for his model. Seriously.)

Thankfully, Mikey chose the essay. Sure, building the model seems like fun, but since he recently broke his arm on the soccer field, a one-handed model-making fest did not appeal to either of us. 

So, he researched and wrote the rough draft of his essay.  Then, I made him go back and write more. Let's just say, it was pretty obvious that he rushed his research and writing to play Minecraft.

Much grumbling ensued.

To top it off, I sat with him while he typed it one-handed. I know, I know...I'm such a mean mom. The reality is that even without a broken arm, he still would type with one hand. He's in third grade, after all.

As he finished the paragraph about the vegetables planted by the Cherokee--including squash, beans, and corn--I reminded him about our garden. 

Our "Three Sisters" garden, based on the companion planting techniques of Native Americans.


Three Sisters Garden, http://growingdays.blogspot.com

Suddenly, something clicks--there's history right in his backyard! He helped shuck corn from the "Three Sisters" garden. We're still eating beans from the garden, much to his dismay. (I think everyone is a little tired of beans. We've harvested a lot of beans.) Sadly, our squash succumbed to the overly wet summer, but we talked about how and why the plants work together.

Luckily, as a garden blogger, I had a photo of the "Three Sisters" garden. He took the photo  to share with his class to show the Native American's farming techniques.

As he finished writing about the discovery of gold on the Cherokee's land and their subsequent death march to Oklahoma, I realized something else.

We planted several heirloom varieties of beans in the garden, including 'Cherokee Trail of Tears,' a bean reportedly carried by the Cherokee on the march, which survived and passed to following generations.

Mikey realized that not only did he help grow an historical garden, he ate beans rich in history. (He may not have liked it--but he did.)

Watching how history came alive for Mikey through our garden, I decided to share Native American history with his friends, too. I sent in 20 envelopes with 'Cherokee Trail of Tears' beans and 'Cherokee Purple' tomato seeds.


Native American seeds, http://growingdays.blogspot.com

Hopefully, history will come alive for other kids in the garden. You can grow a love of learning through a garden, don't you think?

Do you grow anything historical in your garden? Please share!

XOXO ~

Julie

Each month on the 4th, You Can Grow That! features garden advice and tips for growing great gardens.

Thursday, July 4, 2013

Hug a Bee! Protect Our Pollinators.


Who said summer is stress-free and relaxing? Good grief, we've been on the go more in the past three weeks of summer vacation than during the school year! Last week, I tallied 159.3 miles driven in ONE DAY, taking the kids to zoo camp and horseback riding lessons. 

Thank goodness I drive a Prius.

Still, I've felt a little stressed this summer for another reason, and it has nothing to do with spending hours in a car.

Our garden is curiously bare.

The pollinators are missing.
 

Granted, I've seen a few. But in our organic garden, we normally find dozens of caterpillars, happily munching on fennel, dill, and parsley. We watch hummingbirds chase one another around the lantana and the feeders. Butterfly photos crowd my camera, as I try to capture just one. more. shot.

And the bees? Normally, I'm making certain my Epi-pen is within easy grasp.

But this year, the garden is disturbingly quiet.

We've always planted for the pollinators. Whether it's including host plants for larva, like fennel and parsley, or ensuring we have many blooming nectar sources, pollinators typically party in our gardens.


We don't spray--not even organic pesticides, as we know those "safe" sprays can also kill beneficial insects.

Sadly, though, we can't control our neighbors' actions. 

Of course, we worry about colony collapse disorder, but did you hear about the travesty in Oregon, with pesticides killing more than 25,000 bumblebees? Even if we practice organic growing and invite pollinators to our gardens, a mass destruction of pollinators by one irresponsible landscaping company dramatically impacts the ecosystem.

And then, on the heels of the Oregon disaster, 37 million honeybees died in Elmwood, Ontario. The cause? Experts point to insecticides called neonicotinoids, used in planting corn and other crops, as the likely culprit.

It's heartbreaking. Obviously, our garden is not alone in pollinator decline.

Have you seen the photos from Whole Foods Market making the rounds on Facebook? Without pollinators, our selections for dinner look rather bleak.


Ironically, this spring I added two small pollinator gardens near our large kitchen garden, hoping to showcase the importance of planting for pollinators. Granted, I installed the gardens quickly prior to the CFSA Farm Tour so that we could jump-start conversations about the need to protect pollinators. (We already have many host plants in the herb garden and forest surrounding the raised beds.)

It worked well--at least, in launching conversations. But to my dismay, many of the host plants remain pristine, while in previous years we joked about the decimated dill and holey parsley. We WANT these plants to look ratty and tattered, because it means that lovely little caterpillars are getting the nutrition they need to become beautiful butterflies.


Bees and butterflies aren't alone in needing protection. Pesticides affect birds, too, killing off their food sources and impacting their health. Other pollinators, like bats, are succumbing to disease. White-Nose Syndrome, a fungal disease, is responsible for killing millions of bats. While bats are known to eat mosquitoes, we often overlook their contribution to agriculture. Not only do they feast on crop-damaging caterpillars, but they also pollinate certain plants, like agaves. Along with the disease, pesticides also contribute to population decline.


With the bleak news, what can we do to protect our pollinators?


Plant a pollinator garden--You Can Grow That!


First, though, take a pledge to eliminate pesticides in your garden--and encourage your neighbors and homeowners' associations to ban pesticides, too. Honestly? Even "natural" pesticides wreck havoc on beneficial insects. Hand picking pests is much healthier for the environment than spraying poison.


Next, familiarize yourself with the species that live in your area and plant larval host plants, as well as nectar sources, suitable for those pollinators. You can find a list of butterflies in your area by entering your zip code here.


When planning your pollinator garden, choose a variety of plant materials that will provide nectar sources throughout the season. Mix early blooming, mid- and late-blooming annuals and perennials to ensure an adequate supply of food and energy for the pollinators. 

Water, too, is important for attracting pollinators. Birds, bees, and butterflies all benefit from water sources in your garden, from a bird bath or pond to a shallow dish of water. Also necessary is shelter for pollinators. Add a bat box to your garden. Plant trees to encourage nesting. Learn the pollinator species common to your area, and encourage them to make your garden their home.


For instance, Eastern Tiger Swallowtail butterflies reside in my area in South Carolina. When planning our pollinator garden, I looked here to find their host plants, as well as their favorite nectar sources. The caterpillars consume leaves on many of the trees in our forest, such as wild cherry, sweetbay, tulip tree, birch, ash, cottonwood, and willow. For this butterfly, I didn't need to add a host plant, as we already have numerous trees on our property to provide food for the caterpillars. However, I did add some nectar sources. While they enjoy lilac, the bloom time is short in SC, so I added milkweed and Joe-Pye weed to the mix.

Additionally, some plants attract more than one type of pollinator. Passion flower, for instance, serves as a host plant for gulf fritillary caterpillars, while attracting hummingbirds and butterflies with its stunning purple flower for nectar.


Also in my area, black swallowtails use dill as a host plant, with caterpillars consuming the herb. Dill is another good dual purpose plant in a pollinator garden, though, because its flowers also attract lady bugs, predatory and parasitic wasps.

For a list of perennials and annuals to plant in your pollinator garden, check here

Planning and planting a pollinator garden is a perfect family activity. Many of the plants are easily grown from seed, such as zinnias and sunflowers, and the garden provides an excellent learning opportunity to teach our next generation of gardeners the importance of growing sustainably to protect our pollinators. There are many stories to tell and lessons to learn in growing a pollinator garden.

Besides, who doesn't get a thrill when Ms. Monarch pays a visit?

I know I do!

Here's hoping that perhaps our lack of pollinator activity is due to our very wet spring--crossing fingers and toes that with a little more sunshine, we'll find a pollinator party in the gardens.

XOXO ~

Julie

You Can Grow That! is hosted on the 4th of each month, with garden writers sharing the joys of growing gardens.

Shared with From the Farm Blog Hop and The Backyard Farming Connection.

Friday, April 5, 2013

Alphabet Garden—You Can Grow That!

Is there anything better on a chilly day than to browse through seed catalogs, dreaming of spring blooms? Actually, I think there is—sharing those seed catalogs with kids and inspiring the next generation of garden gurus.
A...Azalea


Designing an alphabet garden with a child is a great way to get your gardening fix, while reinforcing ABCs with itty bitty gardeners or teaching older children about planning for edible and decorative landscapes. During the rainy, snowy, cool months, planning an alphabet garden is a fun, not-too-messy art activity. Let the child take the lead in picking plants and designing the garden on paper, while you provide gentle guidance about the plants' growing requirements (sun versus shade, for example.)

 B...Bleeding Heart
Several years ago, I designed and installed an alphabet garden at our children's elementary school. Alphabet gardens provide many learning opportunities that tie into a school's curriculum...but they provide an equally fun learning opportunity at home. In fact, by providing kids with their own plot to plant an alphabet garden, they're empowered to decide upon plants, creatively design the site, read about each plant's growing requirements, and learn the simple tasks of caring for a garden. Observation skills and wildlife care all tie into the learning opportunities with an alphabet garden. 

First, though, create the alphabet garden inside with the child.

Planning Supplies:
  • Seed catalogs (or downloaded photos from seed suppliers, if (like me) you can't bear to part with your catalogs)
  • Scissors
  • Glue stick
  • Markers or crayons
  • Paper or poster board (bigger is better!)
Remember to guide your child as he or she designs the garden. Together, decide upon a location in your garden, or determine where to install a new plot in your yard for the alphabet garden. Help the child sketch out the garden space on paper or poster board, allocating 26 spaces for plants.
C...Columbine
After the initial set-up of the paper garden plot, look through seed catalogs for plant photos from A to Z. (When designing an alphabet garden for children, I stick with common names to make gardening more accessible for kids. Not many children will understand Latin.)

Good seed catalogs will give you specific information about the plants' needs, so help your child pay attention to the following:
  • Sun requirements
  • Size of plants (tall plants may shade smaller plants or large plants may crowd out neighboring plants)
  • Water needs
Once the plants are selected, have the child cut out pictures of the plants and arrange the pictures on the poster board. Let the child take the lead, but help ensure adequate spacing for the plants.

Combining edible plants with ornamentals is a terrific way to teach children about edible gardening. Some plants for an alphabet garden include:

Aster · Beans · Catmint · Daisy · Eggplant · Forget-me-not · Goldenrod · Hollyhock · Ice Plant · Johnny-jump-up · Kale · Lettuce · Milkweed · Nasturtium · Oregano · Peas · Queen Anne's Lace · Rosemary · Snapdragons · Tomato · Umbrella Plant · Violet · Wormwood · Xeranthemum · Yarrow · Zinnia

When the plan is complete and the weather begins to warm, check for your area's last expected frost date for spring planting here. Now, the real fun begins! 

Alphabet Garden Supplies:
  • 26 different plants or seed varieties, one for each letter of the alphabet
  • Gloves
  • Trowel
  • Prepared garden space
  • 26 "ABC" plant markers—stones, wooden letters, handmade plant labels.
It's time to make the child's plan for the alphabet garden a reality! Order seeds to start indoors or direct sow, purchase transplants, or plant some transplants and start the others from seed—it's your call! Stress the importance of practicing organic gardening methods, both for the edible plants, as well as the health of pollinators and wildlife. It's never too early to teach kids the benefits of organic gardening. After all, planting dill to attract caterpillars doesn't make any sense if you douse the dill in pesticide, right?

Let the child take the lead in planting, but offer support and gentle guidance, such as reminding kids to handle seedlings carefully, as well as ensuring adequate spacing. Discuss the plants' needs for food and water, as well as sun, to help them grow strong.

Encourage creativity for the garden décor. Smooth stones painted with the letter and name of the plant make good markers. Wooden letters on dowels from craft stores are adorable, but they can be pricey. (I used these for our school alphabet garden.) Old metal spoons hammered flat and inscribed with the letter and plant name are good, durable, recycled options. Additionally, scare crows are fun decorations to add to an alphabet garden, along with rocks painted like ladybugs. A broken terra cotta pot turned upside down turns into a toad home, and natural decorations like pine cones, stones, and sticks can turn into a fairy home in the alphabet garden. Let the kids' creativity run wild!

Most importantly, have fun with the process of growing the plants, picking flowers, harvesting foods, and sharing time with kids in the garden. After all, who will grow our next generation of garden stewards if not us?
Z...Zinnia
Happy gardening!


Julie

Monday, March 4, 2013

Perfect Peas...You Can Grow That!


We're in serious countdown mode for spring...only 15 days, 5 hours, as of my most recent check. Hooray! But, my friends, you know what that means: it's time to get busy.

I know some of you are still buried in snow. I'm sorry. Here, in our zone 7b gardens, we're cleaning up beds, adding fresh compost, and—of course—planting peas.


Peas are one of the easiest, earliest, and most satisfying spring crops to grow. With two children who fuss about every vegetable served, I'm in heaven when I find something they'll eat without too much drama.

And they eat peas.

Peas get a bad rap. Too many generations grew up with the smelly, unfortunate canned peas that they were forced to choke down at the dinner table. 

Fresh-from-the-garden peas, however, share no resemblance to their canned cousins. These sweet, crunchy, garden treats often don't make it to our dinner table. Instead, they're eaten like candy, munched on while gardening, a handful plucked while playing with pups.

This year, however, I've planted enough peas to ensure they will accompany meals—and hopefully enough to harvest and store as well. While I planted peas in the main kitchen garden, more pea seeds await their new home in the potager. (Can someone please figure out how to add a few more hours to the day? I seriously need the extra time or a clone in order to get everything done. Thank you.)

Of course, I couldn't decide on just one variety. Instead, I selected six pea varieties for the gardens this spring. Golden Sweet, Blauwschokkers (Blue Podded Shelling), Amish Snap, Snowbird, English Sugar Snap, and Tom Thumb are all tucked into the cool soil.

But how do you decide which varieties to select? And how can you ensure good growth and harvest?

No worries. Peas are simple. I promise: You Can Grow That!


Selecting Seed

First, decide which type of pea you and your family enjoy the most. Do you love stir fry? You'll want to grow snow peas in your garden. Do you want to harvest and save peas for winter dishes? You'll want to add shelling peas. If you enjoy eating sweet, crunchy side dishes, sugar snap peas provide a delicious, nutritious addition to dinner.

Or, like me, you can grow a bit of each variety to cover all of your bases.

When selecting seed, you're looking for peas that have edible- or non-edible pods. Non-edible pods are the traditional shelling peas, which are quite labor-intensive. You won't win over the kids' taste buds if you enlist them to shell peas for hours.

Edible-podded peas include snap and snow peas. Snap peas are eaten similarly to snap beans—they are, after all, related. Simply remove the ends and pull off the string, et voilá! A tasty treat, ready for eating. You can also serve them cooked, but remember—less is more. There's nothing appetizing about mushy peas.

Snow pea pods are also eaten. However, they're traditionally picked before the pea inside the pod swells. These are the yummy flat peas most often associated with stir fry.

Of course, it would be too simple to have only two types of peas, right?

Then, we have dual-purpose peas. My purple podded and Golden Sweet varieties can be harvested small and eaten like snow peas, or I can allow them to ripen on the vine to produce shelling peas. (By default, I tend to get quite a few shelling peas when life gets too busy for daily harvesting.)


Grow
Peas benefit from an overnight soaking in water to speed germination. I've planted both straight and pre-sprouted seeds, and I've always enjoyed an earlier harvest from the pre-sprouted vines.

Sow seeds early, as soon as you can work the soil in the spring. (I also plant a second crop in the fall, and in our zone with a bit of frost covering—we harvested peas through December.) Space seeds 2-3” apart and plant at approximately ½-inch depth.

Peas thrive in well-drained, moist soil with good sun, approximately 6-8 hours. Honestly, though—our peas planted in the potager grow well with less than the recommended amount of sun. When planning crop rotation, peas often do well following potatoes, and brassica crops do well following peas, as they absorb the nitrogen that peas nodules provide if the roots remain in the ground.


Pea varieties range from two to 10 feet in height, with the tall varieties requiring trellises. I plant my peas in the same beds that held last season's tomatoes, taking advantage of the staking/trellising system that I used for the tomatoes. Rows of peas are planted on each side of the trellis. In our potager, peas trellis along the garden fence, which is not only practical—it's also pretty. Pea blossoms are a gorgeous addition to the edible garden.

Have limited space or no yard? Peas are an ideal crop for you. Because they grow vertically, you'll have room for other cool weather crops, like lettuce or Swiss chard. A large container and a tomato cage provide an easy method for balcony gardeners to enjoy peas, and the dwarf 'Tom Thumb' variety can easily reside in a window box.

There's really no excuse not to eat your peas.

Harvest
Keep pea vines well-harvested. The more you pick, the more peas the vine will produce. If you plan to eat the pods of 'Golden Sweet' or similar varieties, harvest the pods young. If you prefer shelling peas, make certain the pod is mature—you can see the swell of the peas within the pod.

Be careful when harvesting peas, though. Gently remove the pods with two hands. Trust me. I've been known to break vines in my haste to harvest peas. 


Eat
Unlike the nasty peas we faced as children, homegrown peas are an easy sell. Sweet and tender, they don't need much embellishment. Still, here's a delicious recipe for you to try with your lovely crop of homegrown peas:

(From Chez Panisse Vegetables by Alice Waters)

Snap Pea, Asparagus, and Turnip Ragout

Ingredients:
2 cups snap peas
3 spring onions
20 asparagus spears
10 baby turnips
2 carrots
2 tablespoons olive oil
1 tablespoon unsalted butter
Salt and pepper
1-1/2 teaspoon chopped garlic
1 cup vegetable stock or water
½ lemon

Remove the strings from the snap peas. Trim and peel the vegetables. Slice the vegetables so that they are all about the same size—about ¼ inch thick. The asparagus, snap peas, and carrots can be sliced on the diagonal. Parboil the carrots for 1 minute in salted water.

Heat a large sauté pan and add the olive oil and ½ tablespoon of the butter. When the oil is hot, add the vegetables, tossing often—first the turnips, then snap peas, onions, and asparagus, then the carrots. Cook each vegetable briefly before adding the next. Add salt and pepper. Taste for doneness—the vegetables should be tender. Add the garlic. Continue tossing until, as Ms. Waters writes, “...when the scent of garlic hits your nose, remove the vegetables from the pan.” (Yum!)

Deglaze the pan with the vegetable stock or water and add the remaining butter and a squeeze of lemon juice. Let the sauce reduce by one third and pour it over the vegetables. Serves 4.


Is it spring yet? I'm so ready for delicious peas and asparagus.

Now, out you go, into the garden with pea seeds in hand! Just think—in a few months, you will thank me for forcing you out into the cold to plant your peas.

And we'll both thank Alice Waters as we feast on her delicious recipe.

Happy gardening!

XOXO ~

Julie

Join Garden Writers on the 4th day of each month to find out how You Can Grow That!

Tuesday, February 5, 2013

Seductive Strawberries.


Strawberries and champagne—the ultimate romantic hors d'oeuvre. Honestly, who doesn't remember Pretty Woman, when Julia Roberts coyly excuses herself to floss after eating strawberries?


It's one of my favorite scenes.


(Well, that...and every image of Richard Gere.)


Strawberries and romance share a long history. With its heart shape, the strawberry symbolized Venus, the Goddess of Love. In France, newlyweds received a soup made from strawberries, sour cream, borage, and powdered sugar to serve as an aphrodisiac. And if you're looking to fall in love, just break a double strawberry in half and share it with your crush. According to legend, you'll soon be inseparable.


With its rich mythology and delicious history, is it any wonder that strawberries are a main ingredient in Valentine's Day? Chocolate covered, tarted up, or baked into a pie, strawberries are the fruit of love.


Actually, it's perplexing. Strawberries aren't in season on Valentine's Day--unless you live in Florida or California. And honestly—nothing compares to the deep, rich, sun-warmed sweetness of just-picked strawberries. So, although they're the fruit of choice for Valentine's Day, strawberries eaten on February 14 hardly compare to the backyard berries of spring.


Growing strawberries is simple. Often, gardeners become intimidated when researching how to grow strawberries. Rows or mounds? Plastic or straw? June-bearing or everbearing? While there are many options for varieties and growing methods, the process doesn't need to be complicated for a home grower.


In our garden, for instance, strawberry plants serve as a border in our potager. As the strawberry plants in the potager grew new runners, I harvested the babies and began a new bed by the greenhouse. And when we harvested more runners, the kids planted them in their raised bed garden. We didn't mound, we don't use plastic—and we definitely don't use any spray. Our result? Hundreds of perfect, achingly sweet organic strawberries—in three small beds.


Large commercial growers, of course, treat their strawberry crops differently. Because strawberry plants decline in production after two years, commercial growers treat the plants as annuals. In our zone 7b garden, however, our strawberry plants are perennials, performing year after year, until we notice a decline. (We haven't yet.) Then, as our plants slow in production, we'll replace old plants with runners we've harvested from other beds, ensuring an endless supply of fresh starts as we need them.


Strawberries may be my favorite perennial plant.


Types

June bearing (spring bearing) strawberries produce a crop during a three-to-four week period in the spring, with the duration based on the climate. June bearers produce flowers, fruits, and runners and are classified into early, mid-season, and later varieties. June bearing plants are ideal if you want a large harvest at once to make jams, for instance.


Everbearing strawberries produce three periods of flowers and fruit: spring, summer, and fall.


Day neutral strawberries produce fruit throughout the growing season, producing only a few runners. These plants work well for gardeners with limited space or who want to incorporate strawberries into borders or containers.


Isn't this a great idea? Strawberry baskets for space-challenged gardeners!


When to Plant

In cold climates, plant strawberries as soon as the ground can be worked in the spring. In warmer climates, fall planting is ideal. 


How to Plant

Strawberries prefer well drained soil, rich in organic matter. Plant in an area that receives at least 6 hours of sun for best fruit production, and ensure the plants receive at least an inch of water per week during the growing season. Don't plant strawberries in a bed where peppers, tomatoes, eggplant or potatoes resided. Strawberry plants are susceptible to verticillium wilt, which can be spread by nightshade plants.


Like all transplants, strawberries should be planted on a cloudy day or during late afternoon, rather than in full sun. Set the strawberry plant in the soil so that the soil is just covering the tops of the roots. Do not cover the crown. After four to six weeks, the plants will produce runners and new plants.


When you research planting strawberries, all of the experts will tell you to remove the flowers of the newly planted strawberries during the first season to develop strong roots and runners. The goal is to ensure a large crop the following year.


I can't do it.


In fact, I've never pinched back the flowers. And guess what? We had a nice little, delicious harvest the first year...and the second year, we could barely keep up with harvesting the berries.


Maintenance

Spring frosts and freezes can wreck havoc on your strawberry patch. Mulch or row covers can protect the blossoms. In colder zones, a thick layer of straw provides good insulation for strawberries. Remove the top layers in the spring, but keep it close by in case of a late frost. Additionally, mulching with straw around the base of the plants helps retain moisture and keeps the fruit off the soil, which can promote disease and pest damage.


Always remove any damaged fruit or dead leaves to avoid pests or disease.


Harvest

Wait to harvest until the berry is fully ripe. Unlike some fruits, strawberries do not continue to ripen after harvest. Leave an inch of stem attached, and refrigerate to preserve freshness. Wash immediately before use.


Eat

In honor of Valentine's Day, I baked a classic romantic dessert: Strawberry Tart. It's February, so I admit--I used store bought Florida berries. Still, it was pretty delicious. Now, imagine it with fresh, just-picked strawberries...oh my. This is definitely a recipe to make again in May.

Strawberry Tart

Adapted from Southern Living


Ingredients

1-1/2 cup all-purpose flour

½ teaspoon salt

1/3 cup sugar

1/3 cup butter, cut up

2 tablespoons cold shortening

3 tablespoons cold water

½ cup sugar

¼ cup cornstarch

2 cups half-and-half

5 egg yolks

3 tablespoons butter

1 teaspoon vanilla extract

1 quart fresh strawberries, sliced


Instructions:

  1. Mix first three ingredients together, then add 1/3 cup butter and 2 tablespoons shortening. Mix until crumbly.
  2. With mixer running, slowly add 3 tablespoons water. Mix until dough forms a ball, adding more water as needed. Wrap dough in plastic wrap and chill for 1 hour.
  3. Roll dough to 1/8-inch thickness on a lightly floured surface. Press into bottom and sides of a 9-inch tart pan. Line dough with parchment paper; fill with pie weights (which I don't own) or dried beans (chickpeas worked for me!)
  4. Bake at 425 degrees for 15 minutes. Remove the weights/beans and parchment paper. Bake an additional 3-5 minutes.
  5. Combine ½ cup sugar and cornstarch in a medium saucepan.
  6. Whisk together half-and-half and egg yolks. Gradually whisk half-and-half mixture into sugar mixture in saucepan over medium heat. Bring to a boil and cook, whisking constantly, 1 minute. Remove mixture from heat.
  7. Stir in 3 tablespoons butter and vanilla; cover and chill at least 4 hours. Spoon into prepared pastry shell. Top with sliced strawberries and serve immediately.


So, are you ready to plant your strawberry patch? I promise—You Can Grow That!


XO~


Julie